On this page
- Archive into an indexed folder backed by SQLite
- Copy into a new organized folder
- List or open photos by their metadata
- Query your photo archive with AI assistants over MCP
- Export every photo’s metadata to a CSV report
- Navigate your photo locations on Google Maps & Earth
The test photo set
Every example on this page uses the same starting folder — 18 photos and 1 companion file across two subfolders, plus 2 photos at the root:DSC_1770.JPG and DSC_1770_(same).jpg are byte-for-byte duplicates, Italy album/IMG_2371.jpg has a taken date but no GPS, Spain Journey/IMG_5397.jpg has neither, and IMG_1979.mov / IMG_1979.xmp / IMG_O1979.aae are companion files for the IMG_1979.HEIC Live Photo.
1. Archive into an indexed folder backed by SQLite
Thearchive command is built for long-term, incremental storage. It always lays photos out as [year]/[month]/[day]/, embeds a SHA1 hash in every file name to prevent duplicates, records every photo (and the albums it belongs to) in a local SQLite database, and — when asked — deletes the source files after verifying every copy. See the archive command reference for every supported argument.
Run the command
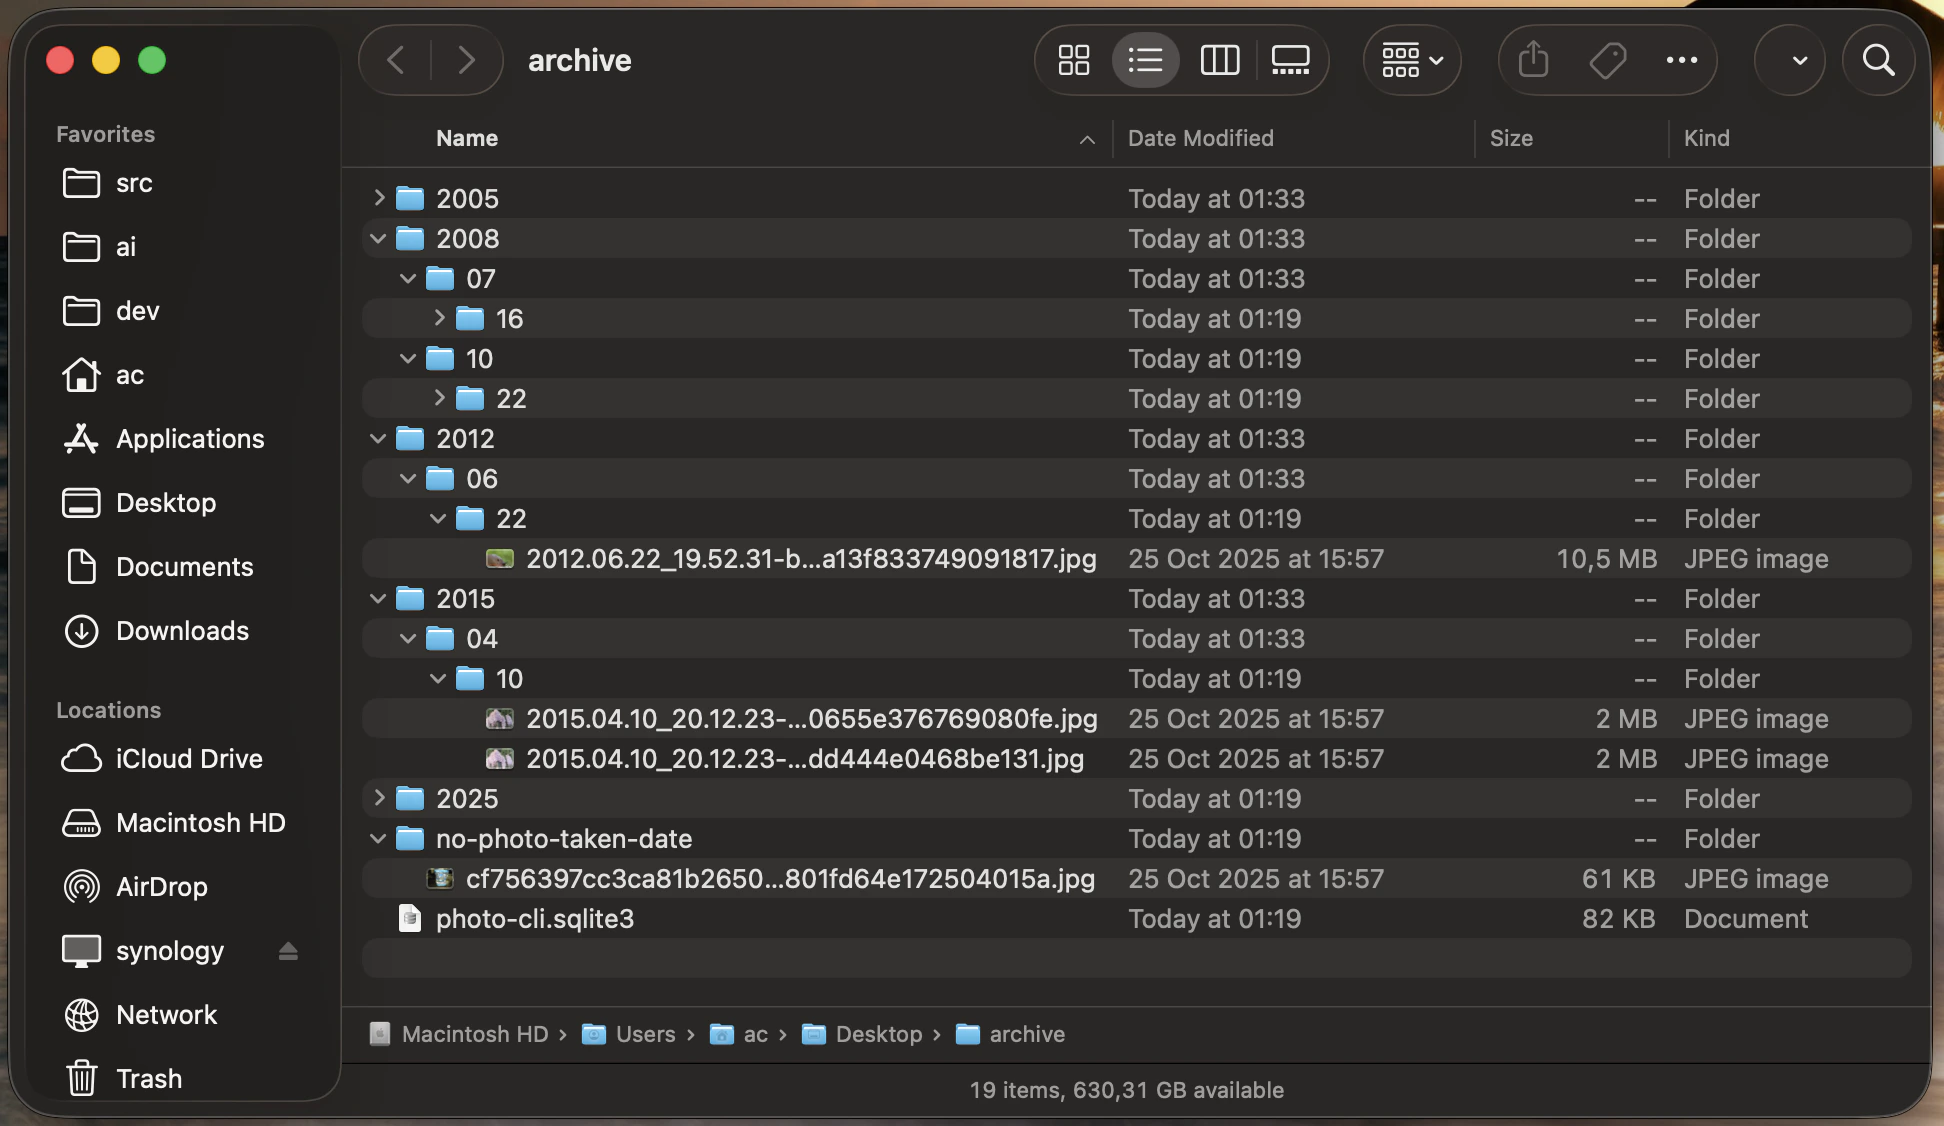
Before and after
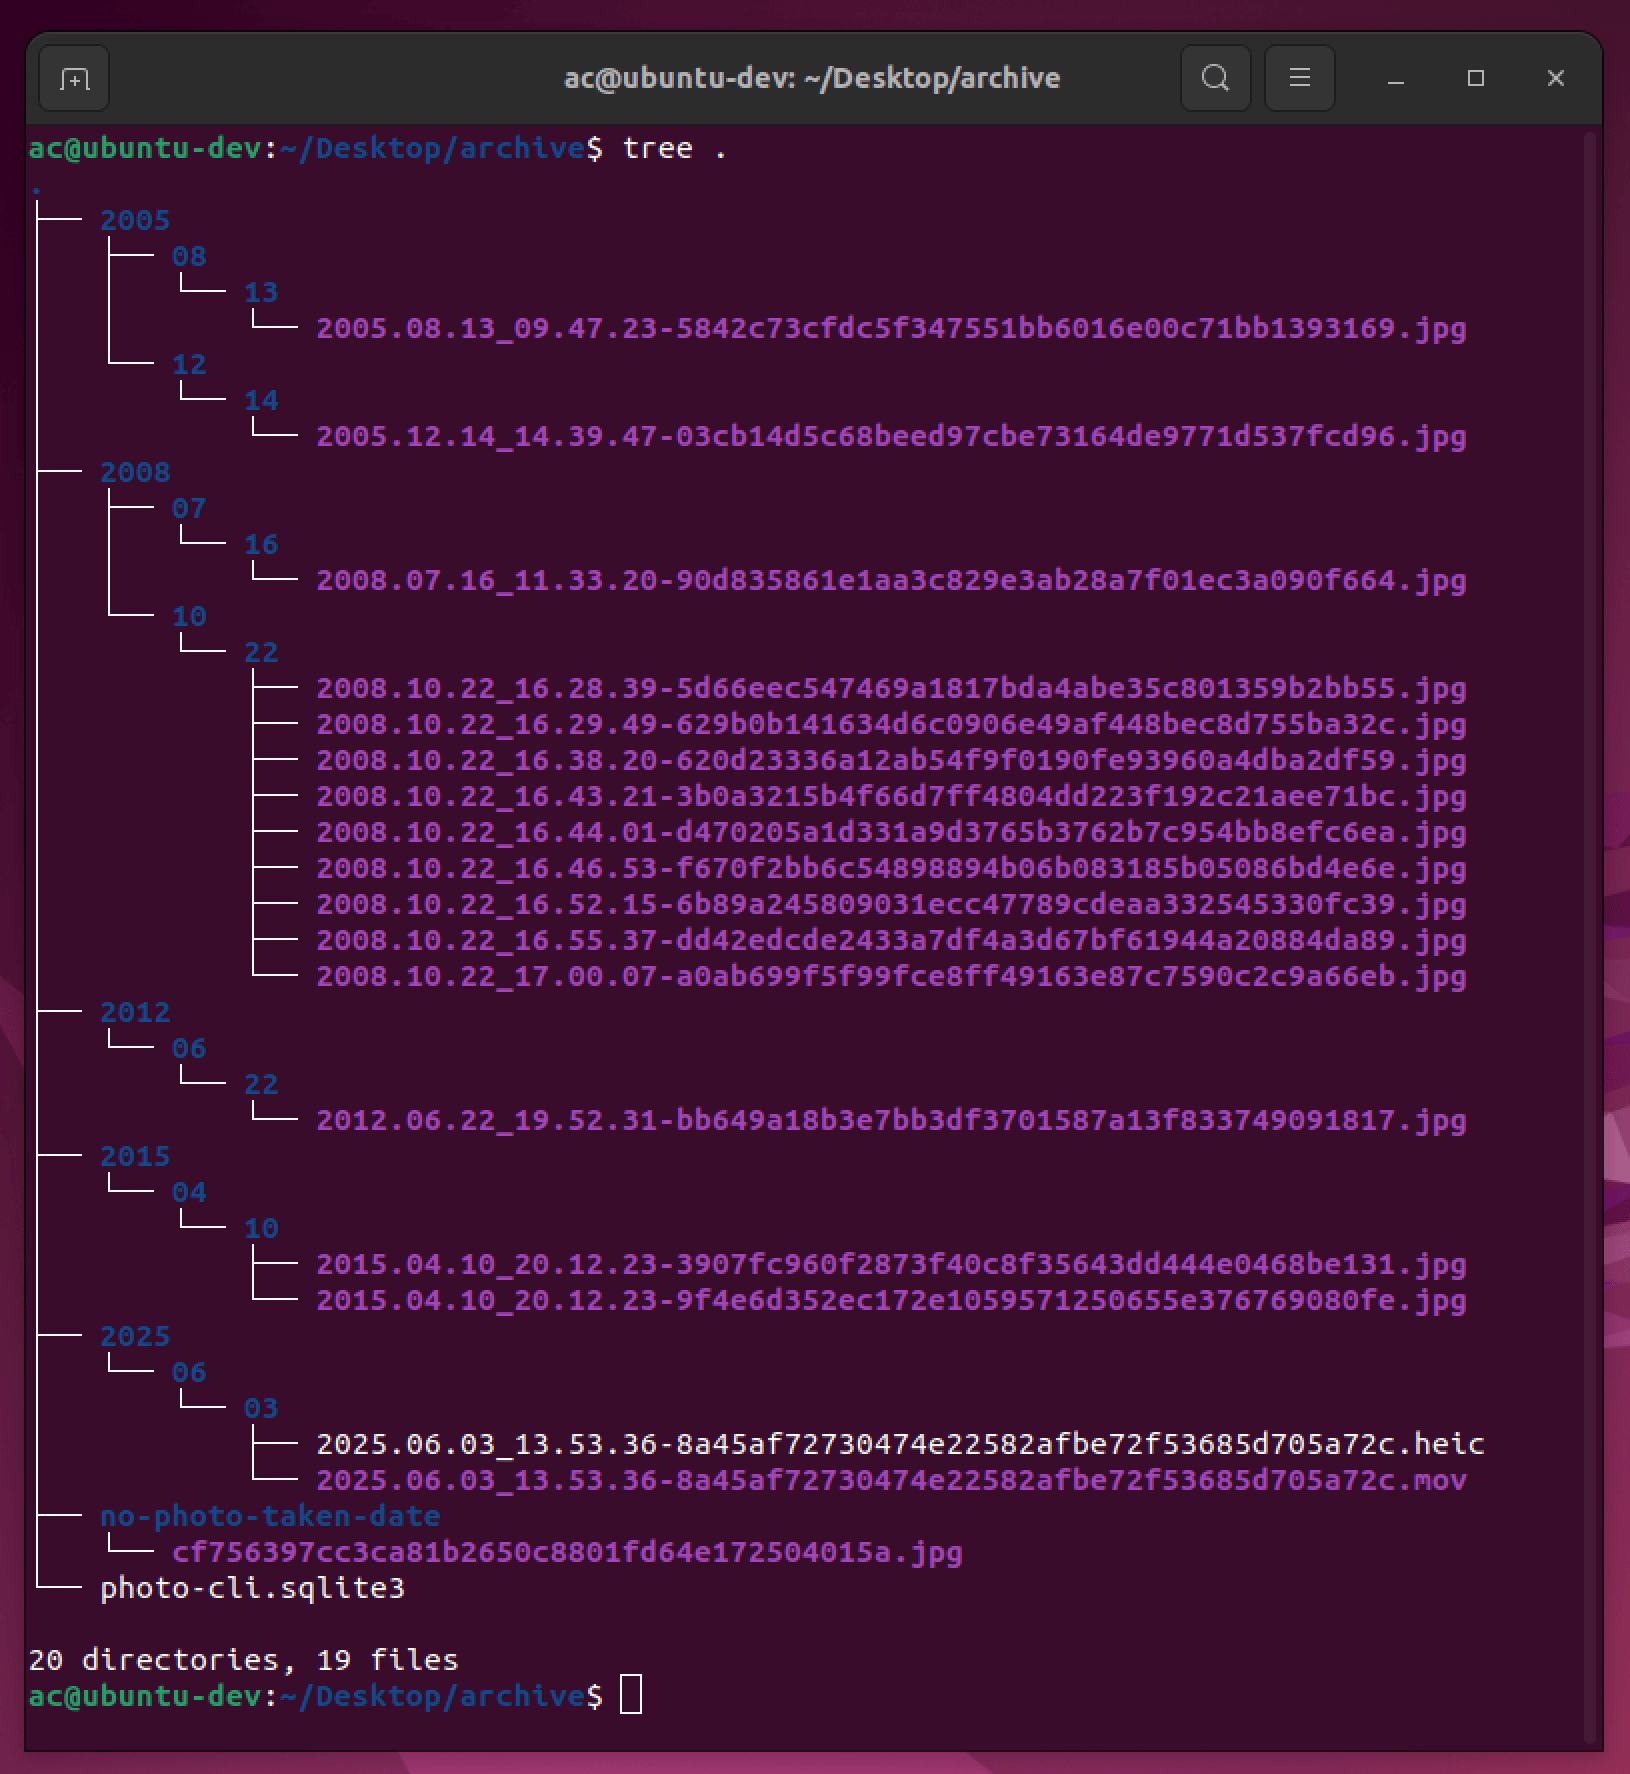
Before — the test photo set above. AfterWhat happened, step by step
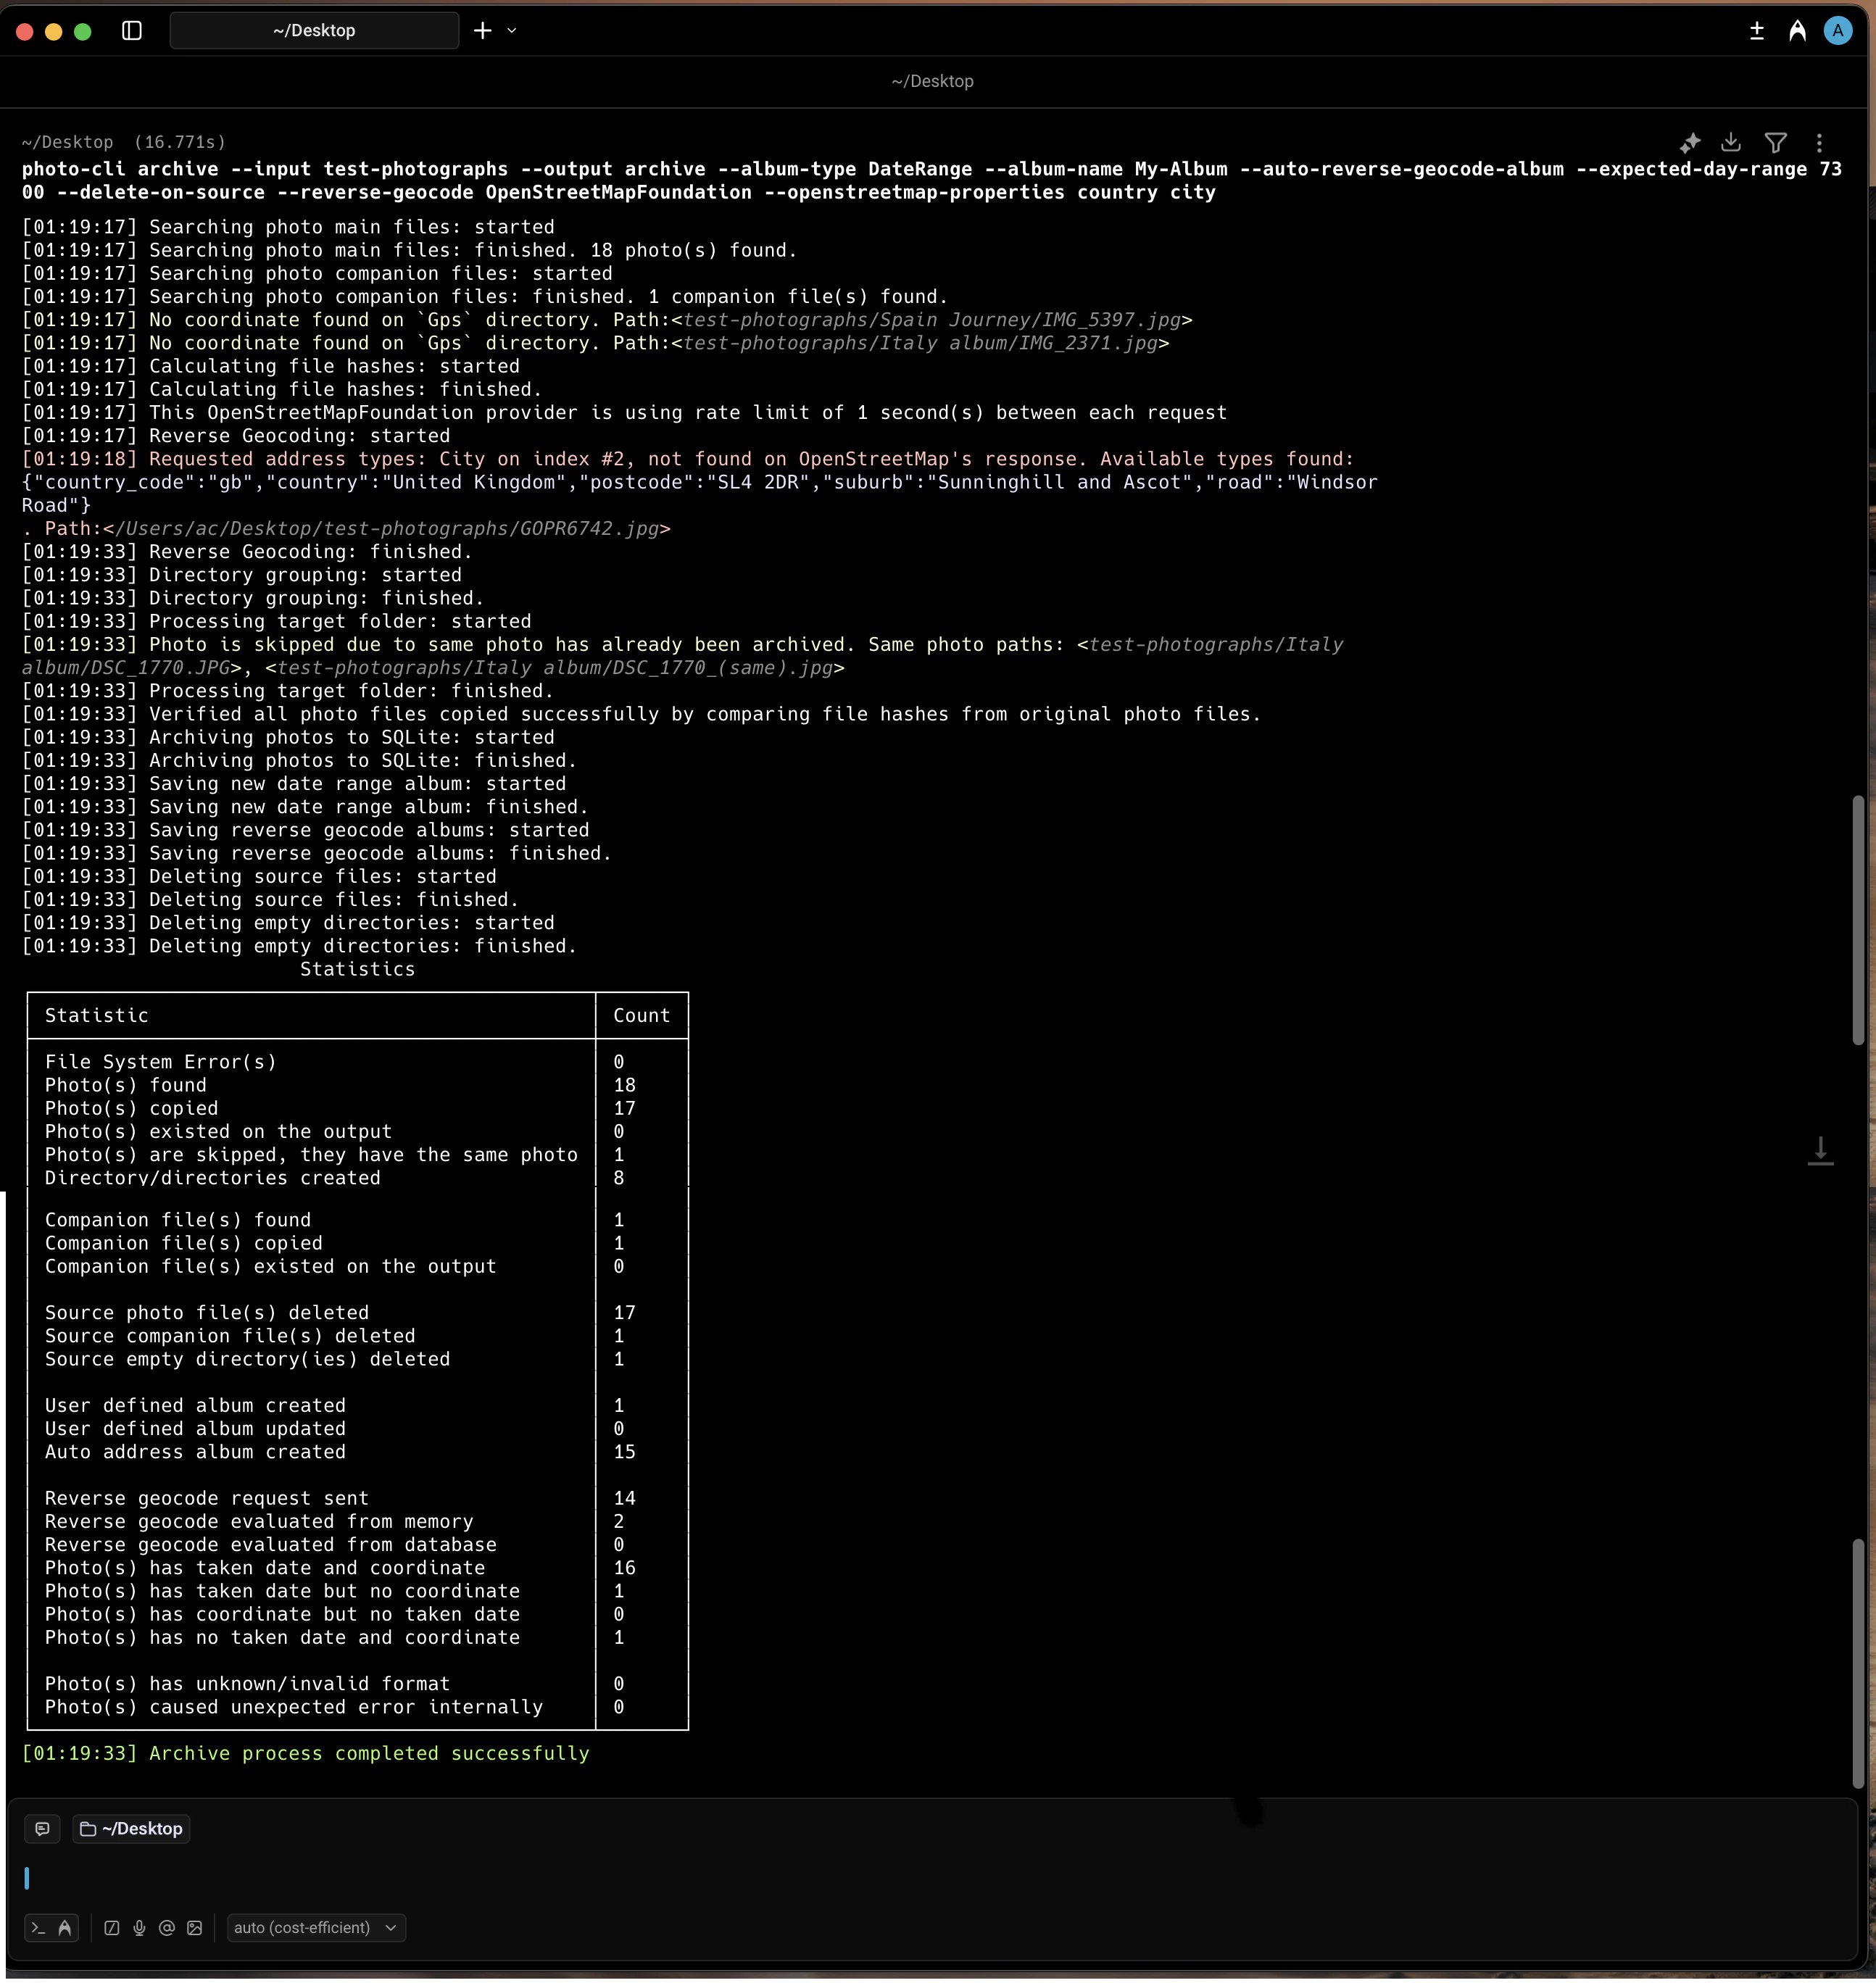
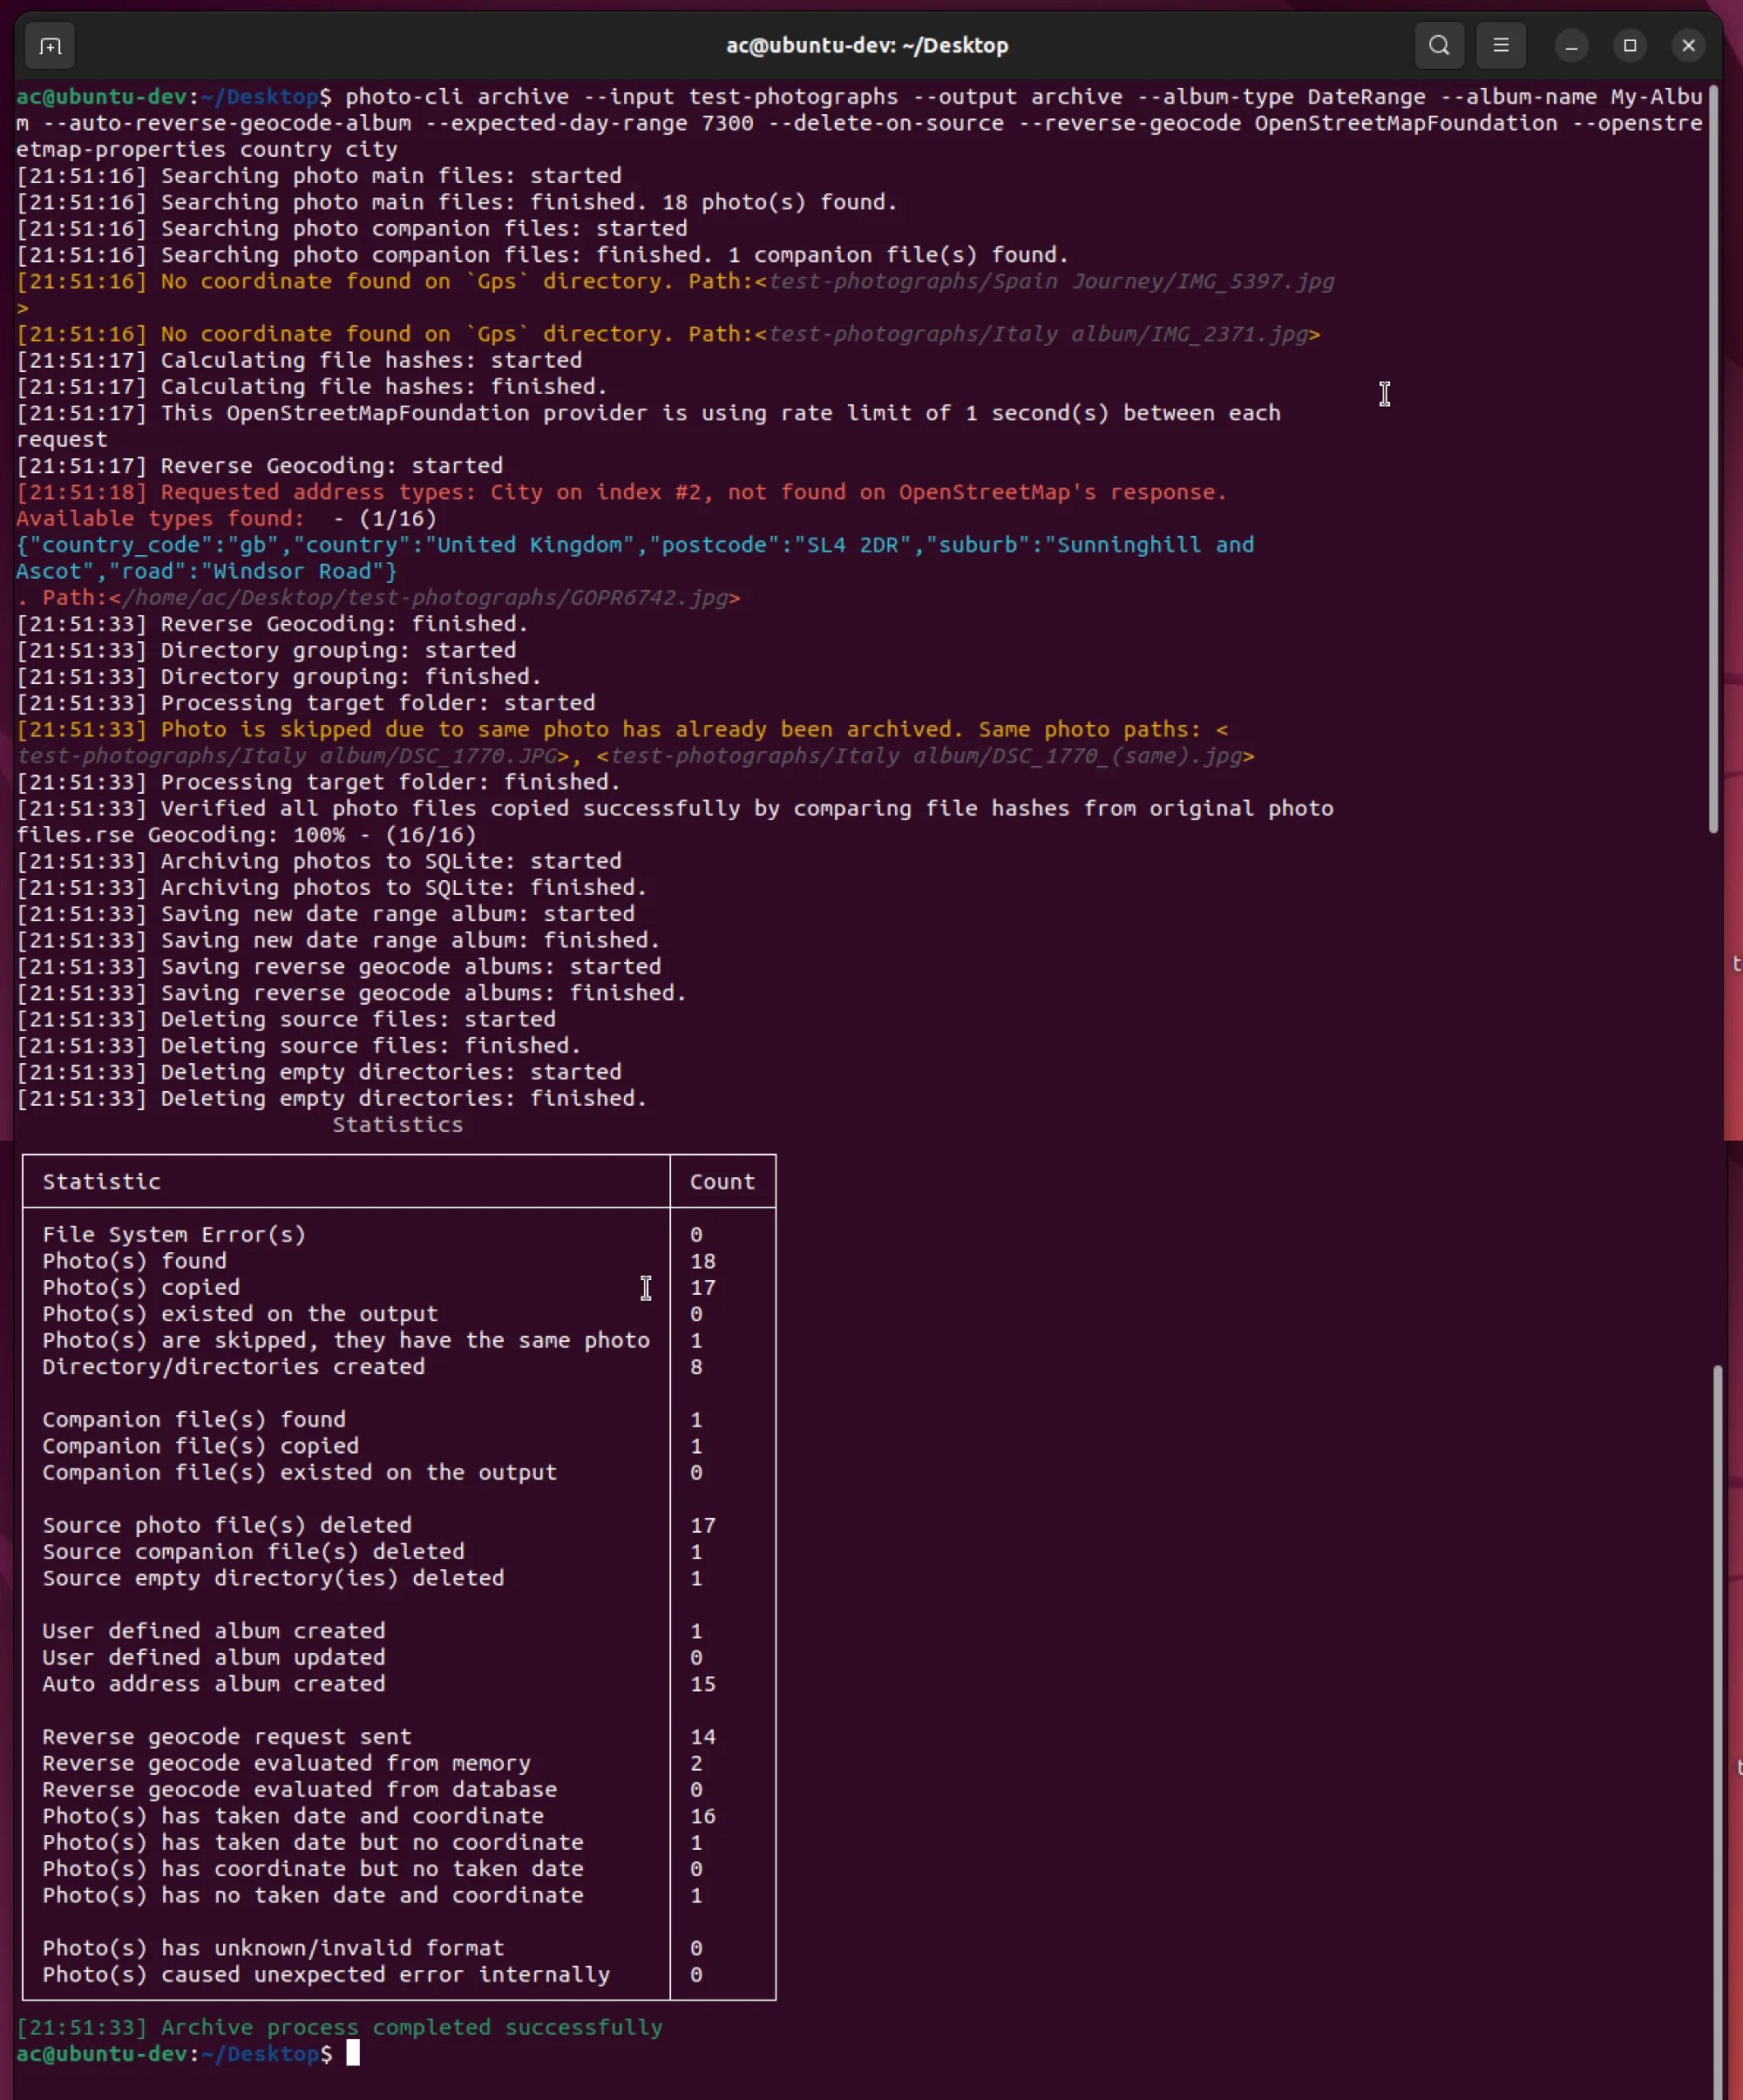
- Discovery. photo-cli walked the source folder and found 18 photos and 1 companion file (
IMG_1979.mov, the Live Photo clip that travels withIMG_1979.HEIC). - EXIF extraction. For each photo it read the taken date and GPS coordinates.
- Reverse geocoding. Coordinates were sent to OpenStreetMap and an address was built from the requested administrative levels (
country city). Repeated coordinates were deduplicated in memory so the rate-limited API was only called once per unique location. - Day-range guard.
--expected-day-range 7300rejects archives whose photos span more than ~20 years. This is a safety net to catch a mis-pointed source folder before any copy happens. - Year/month/day layout. Every photo lands in
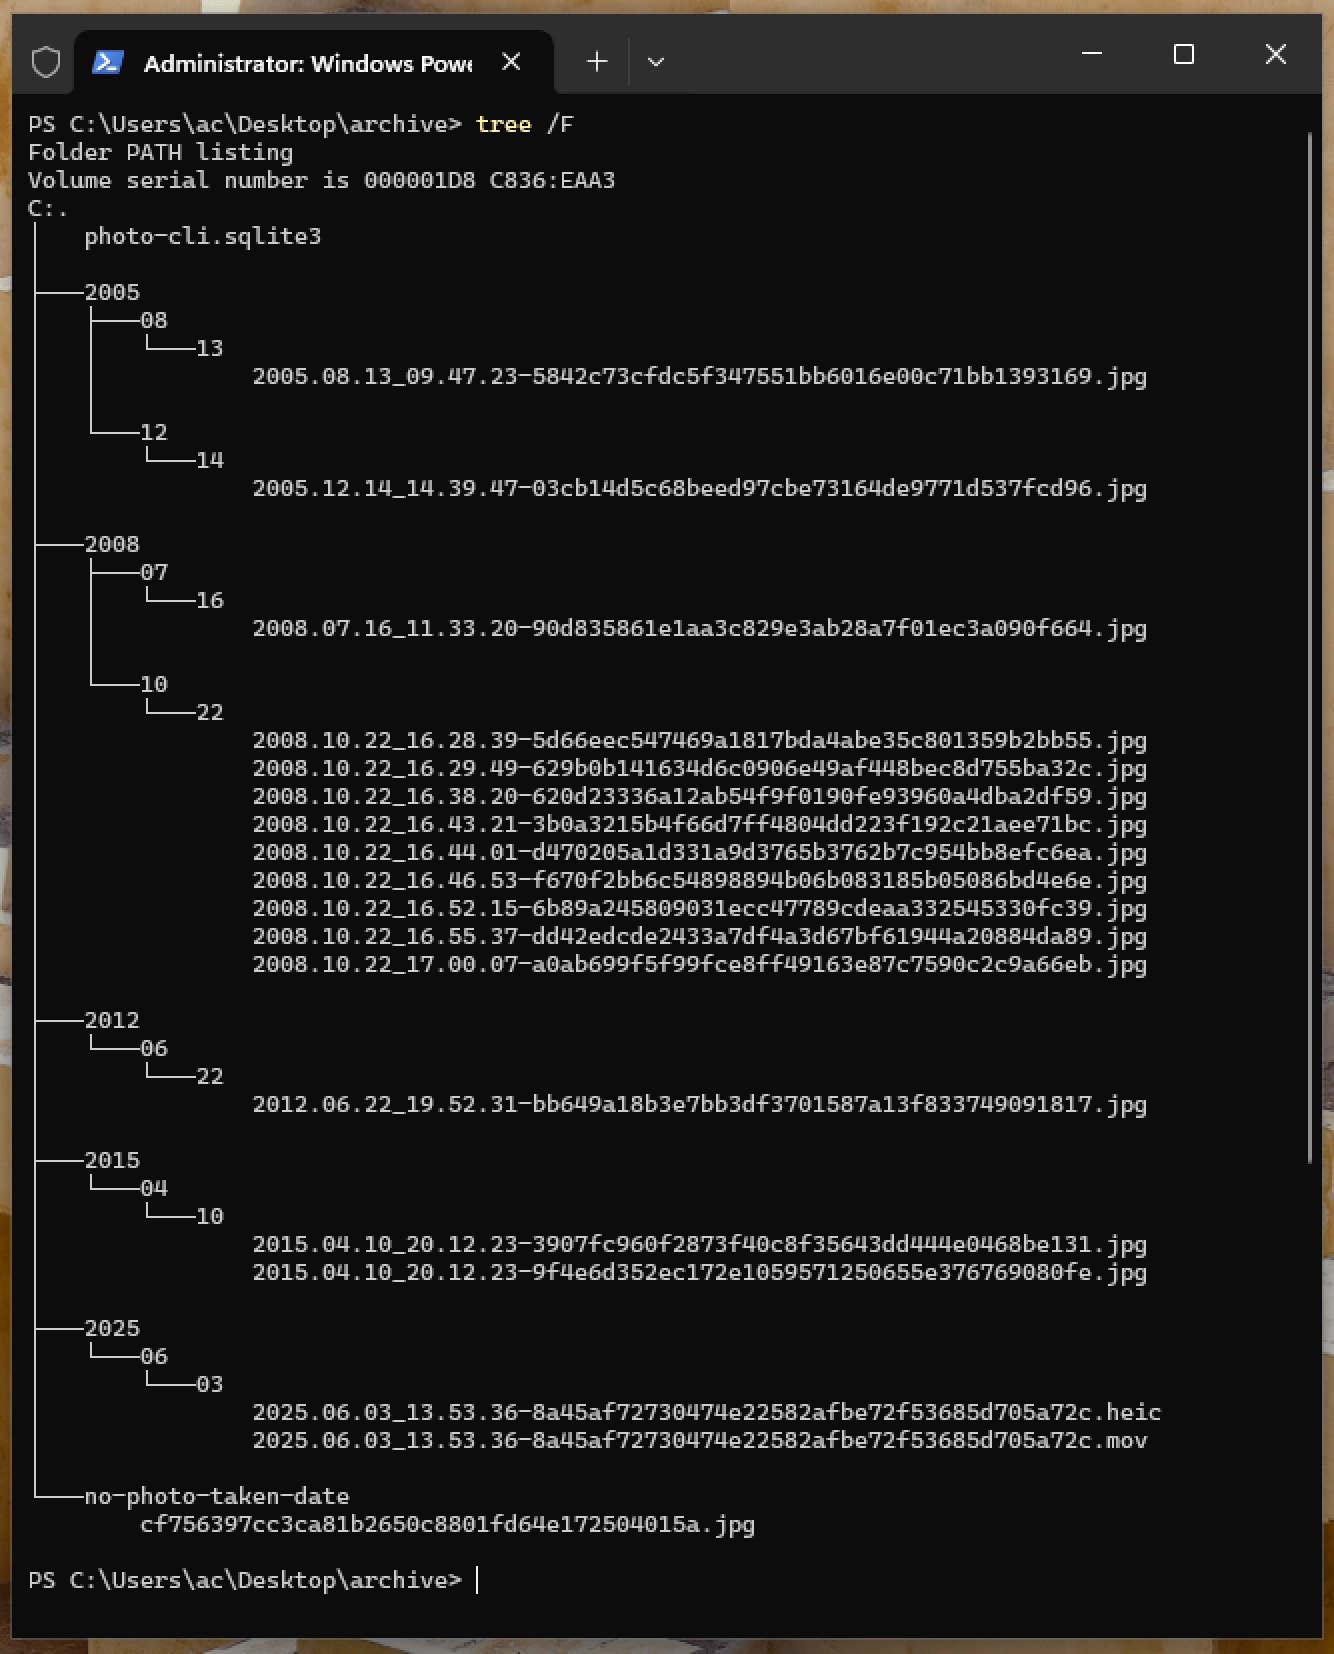
[year]/[month]/[day]/derived from its EXIF date — for example/2008/10/22/. - SHA1 in the file name. Files are renamed to
yyyy.MM.dd_HH.mm.ss-{sha1}.ext(e.g.2008.07.16_11.33.20-90d835861e1aa3c829e3ab28a7f01ec3a090f664.jpg). Companion files keep their own extension but share the SHA1 stem of their main photo. - Automatic deduplication.
DSC_1770.JPGandDSC_1770_(same).jpghash identically — only one is copied; the other is logged as skipped. - No-date fallback.
Spain Journey/IMG_5397.jpghas no taken date, so it goes intono-photo-taken-date/and is named with only its SHA1. - Copy verification. After copying, photo-cli re-hashes every output file and compares it to the source. A disk error during the copy would be surfaced immediately.
- SQLite indexing. All metadata — path, taken date, coordinates, formatted address, individual
Address1..Address8levels, SHA1 — is written tophoto-cli.sqlite3at the root of the archive. - Albums.
--album-name My-Album --album-type DateRangecreates a user-defined date-range album spanning the earliest and latest photo.--auto-reverse-geocode-albumadditionally creates one album per geocoded level (e.g.Italia,Italia-Firenze,Venezia,United Kingdom) so you can later open every photo from a country, city, or region without remembering exact dates. - Source cleanup.
--delete-on-sourceremoves the source photos, companion files, and now-empty directories — but only after the verification step in step 9 succeeded. - Statistics. A summary table is printed to the terminal: photos found vs. copied vs. skipped, geocode requests sent vs. served from cache, albums created, and so on.
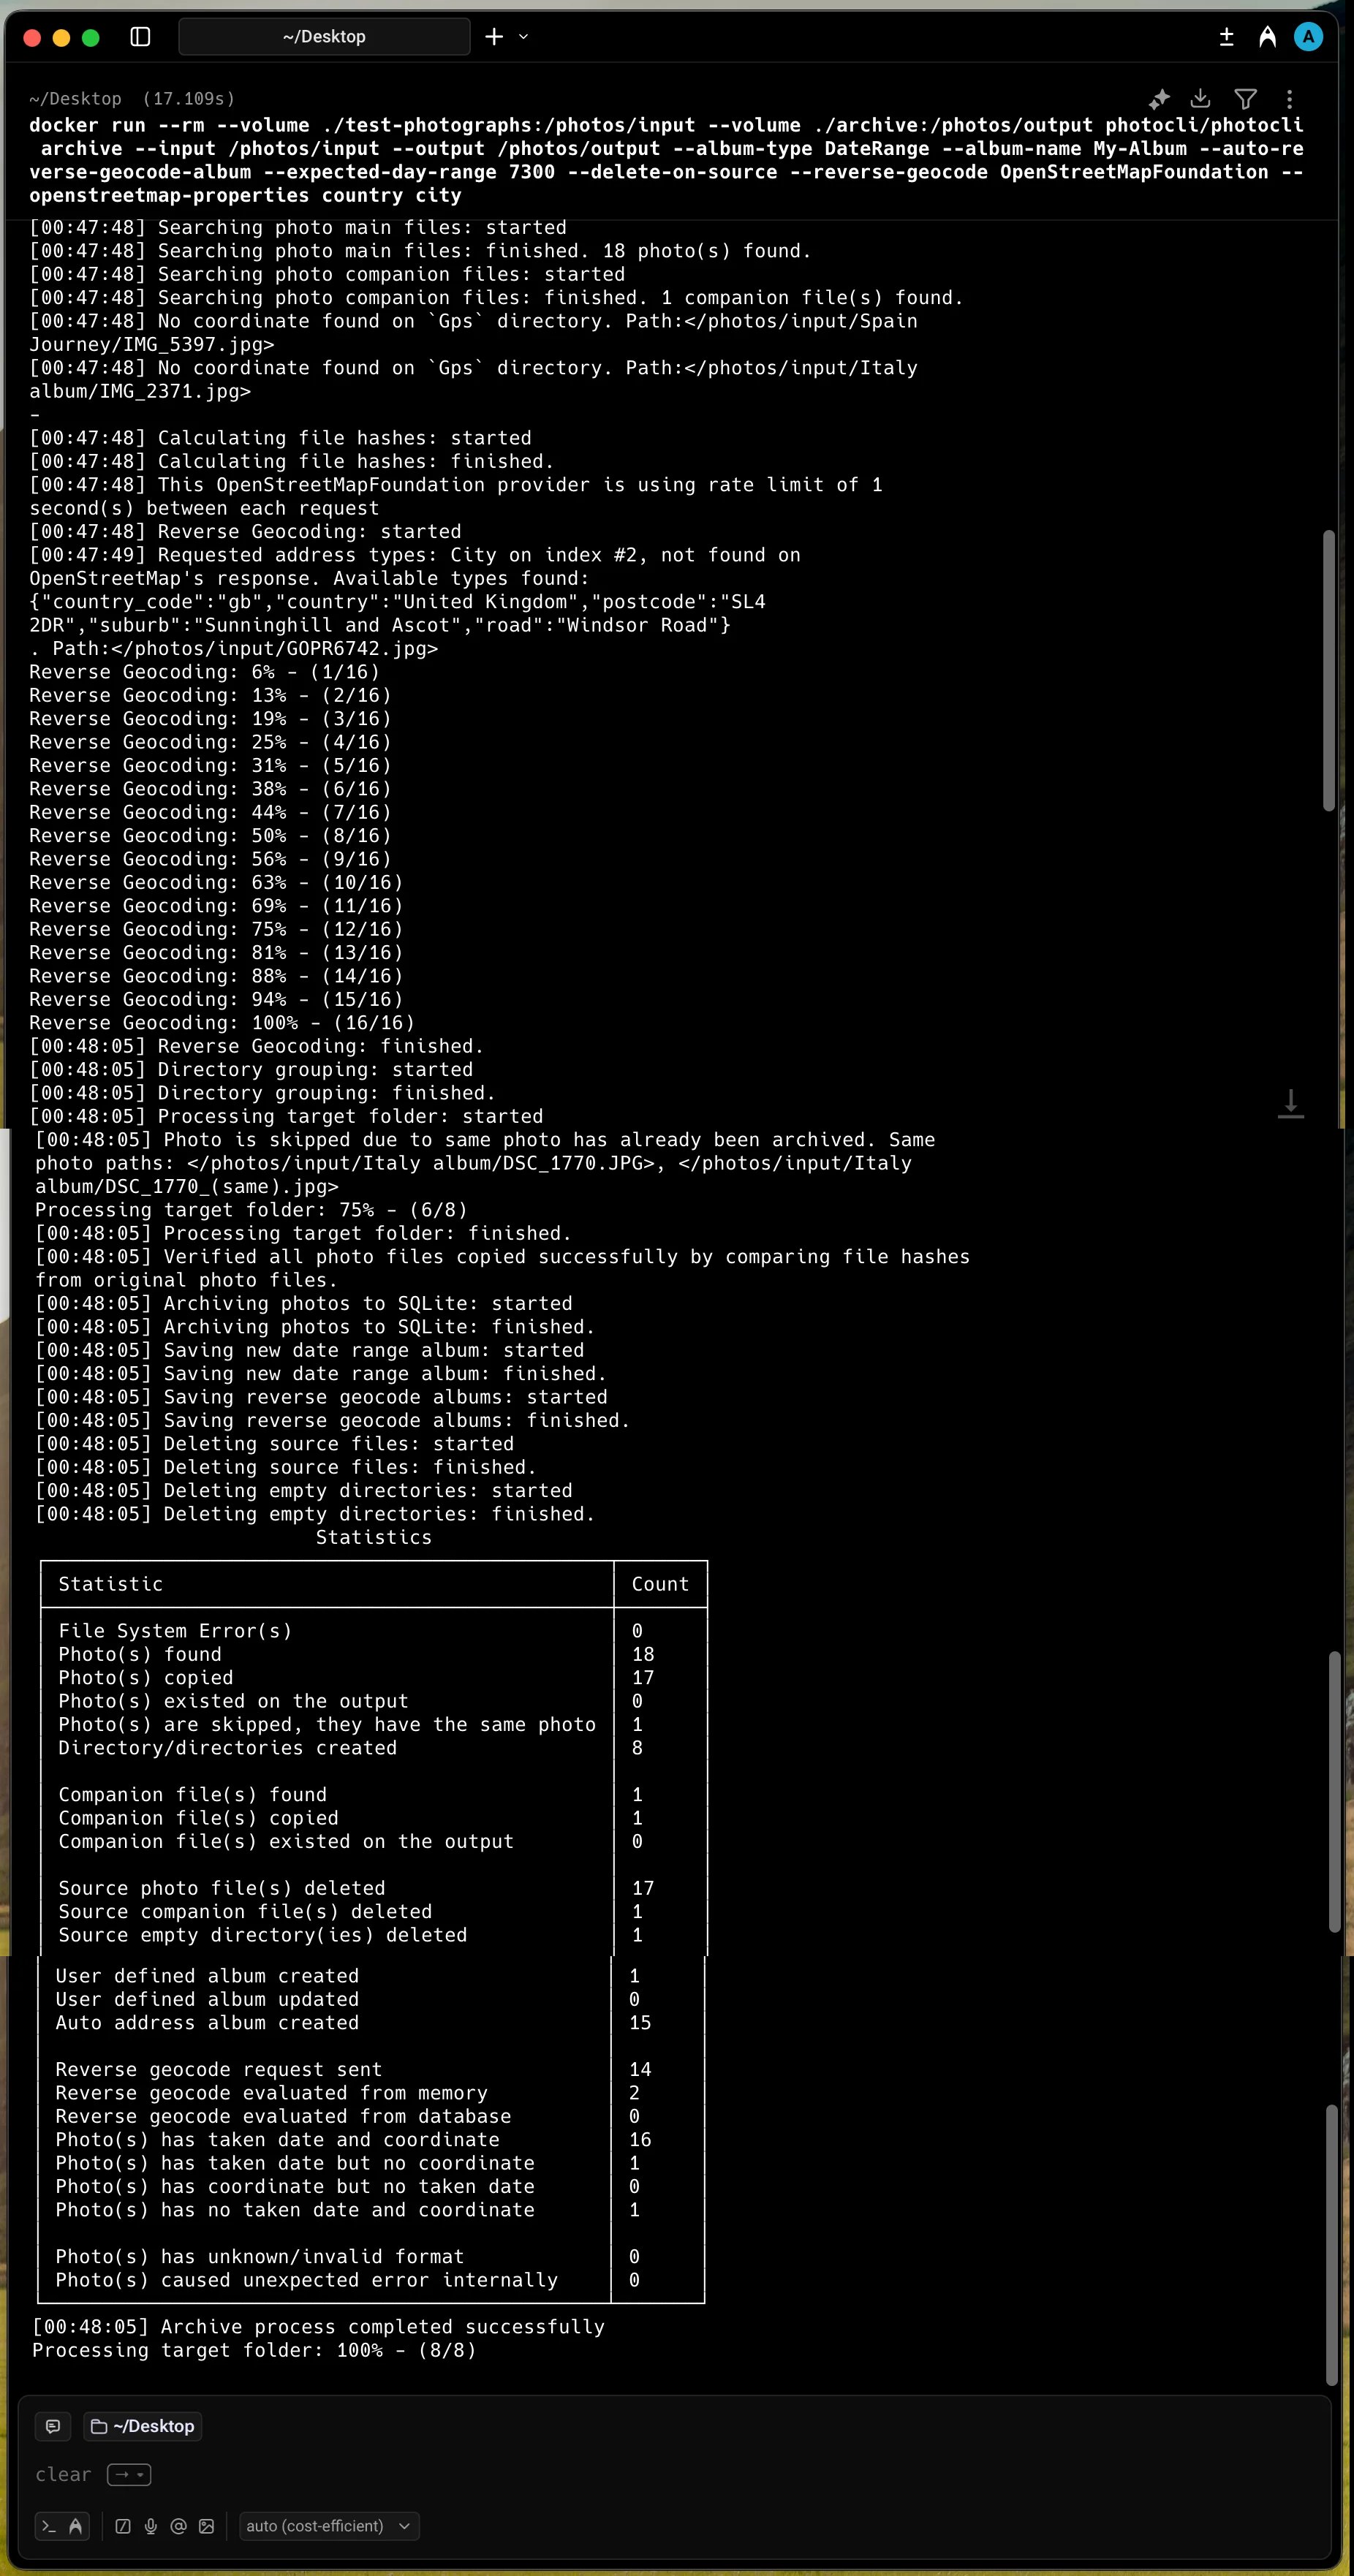
Console output
Full progress log and statistics table
Full progress log and statistics table
The archive layout is intentionally fixed —
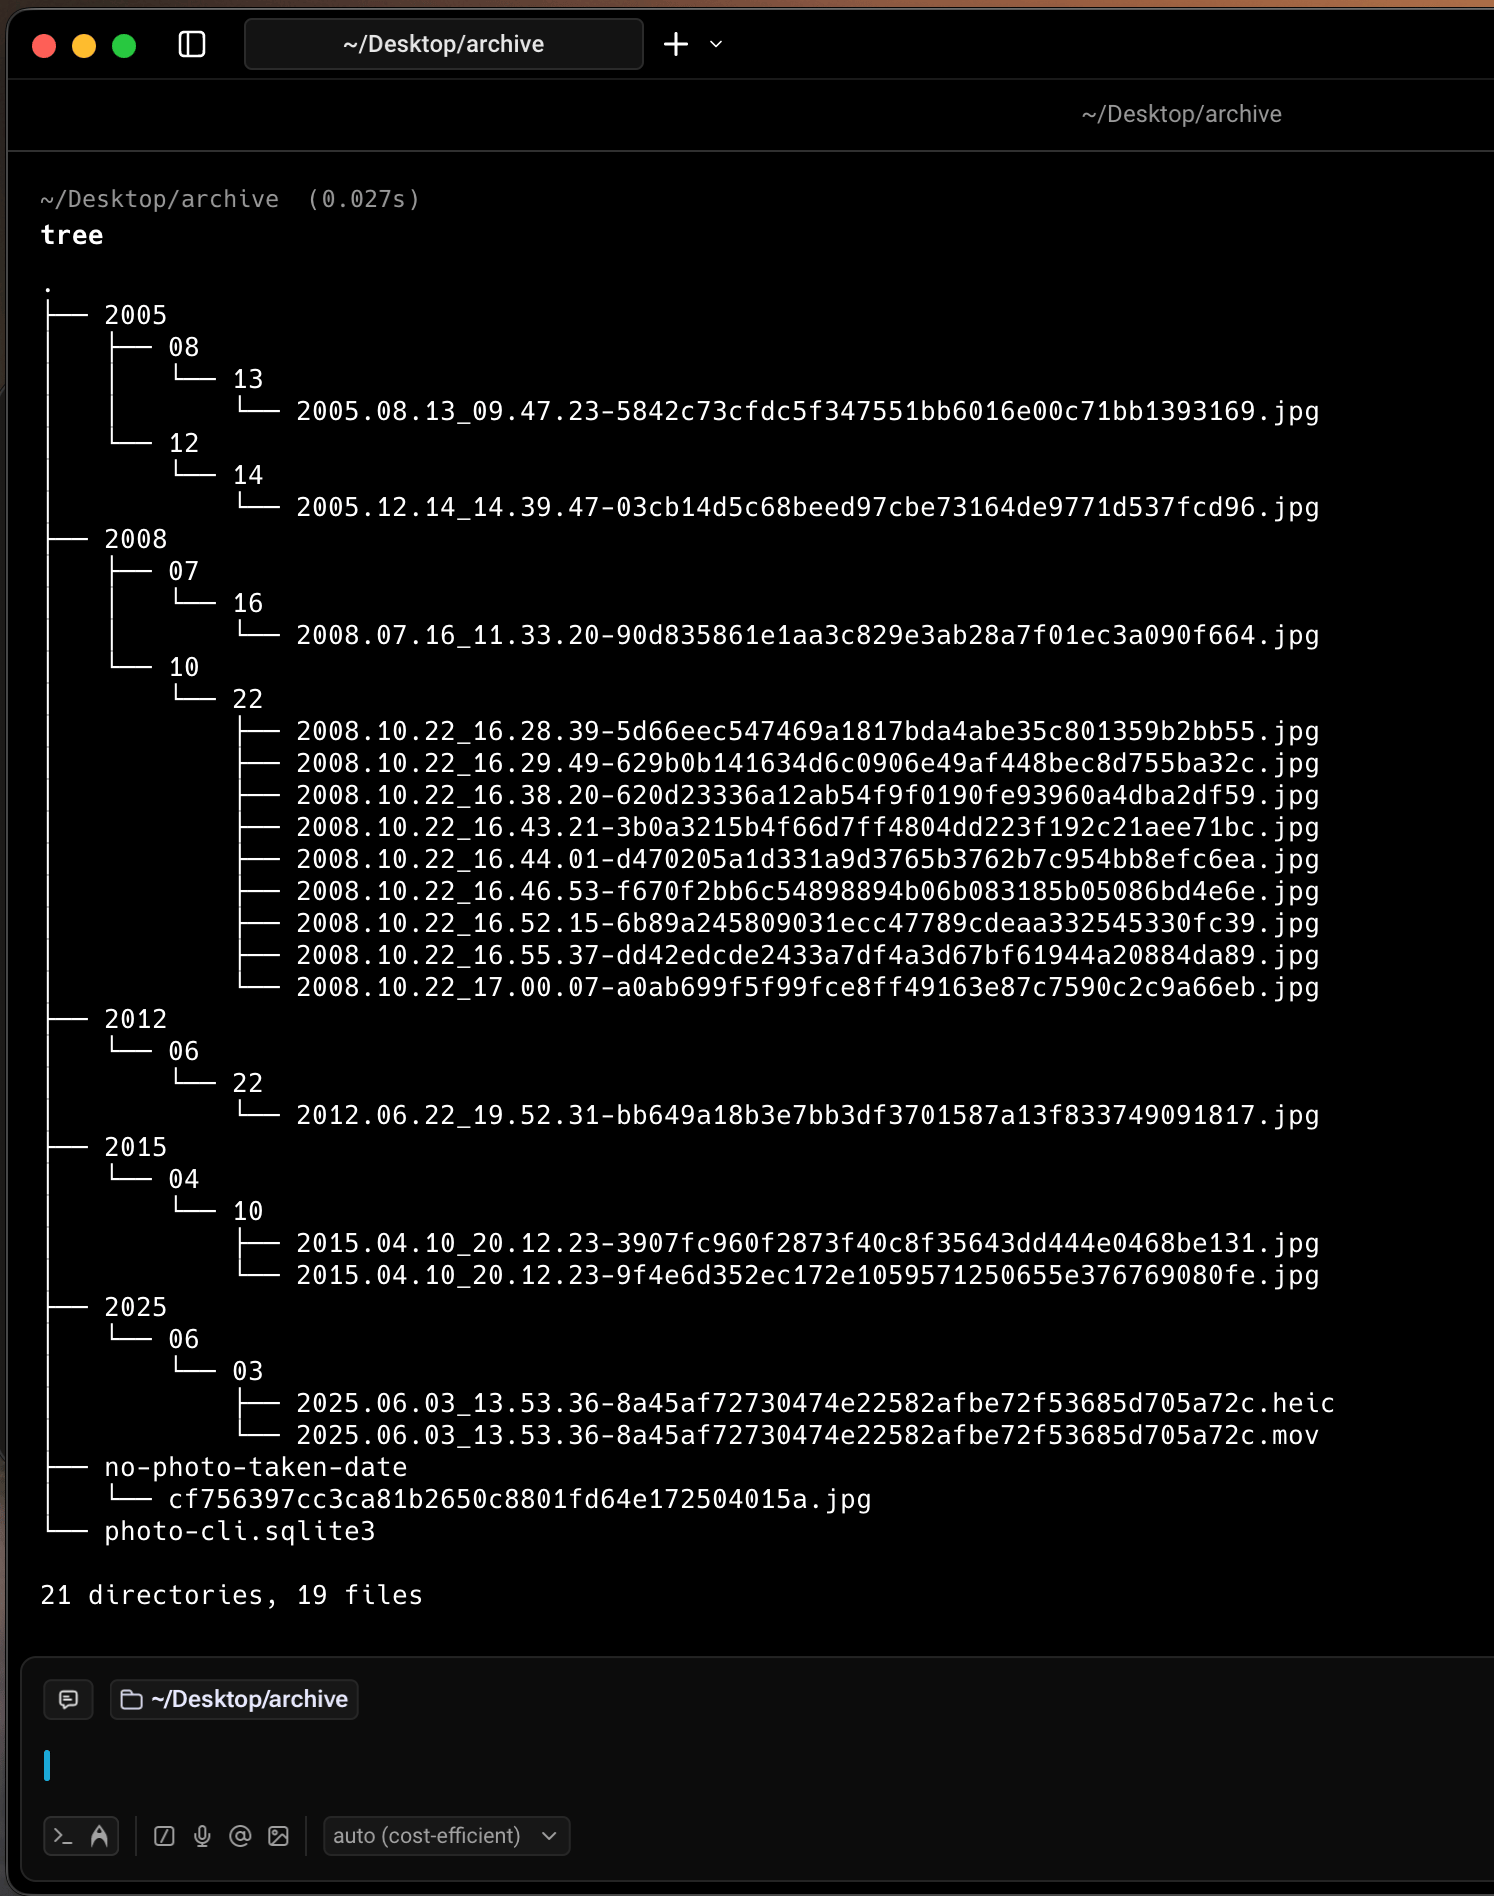
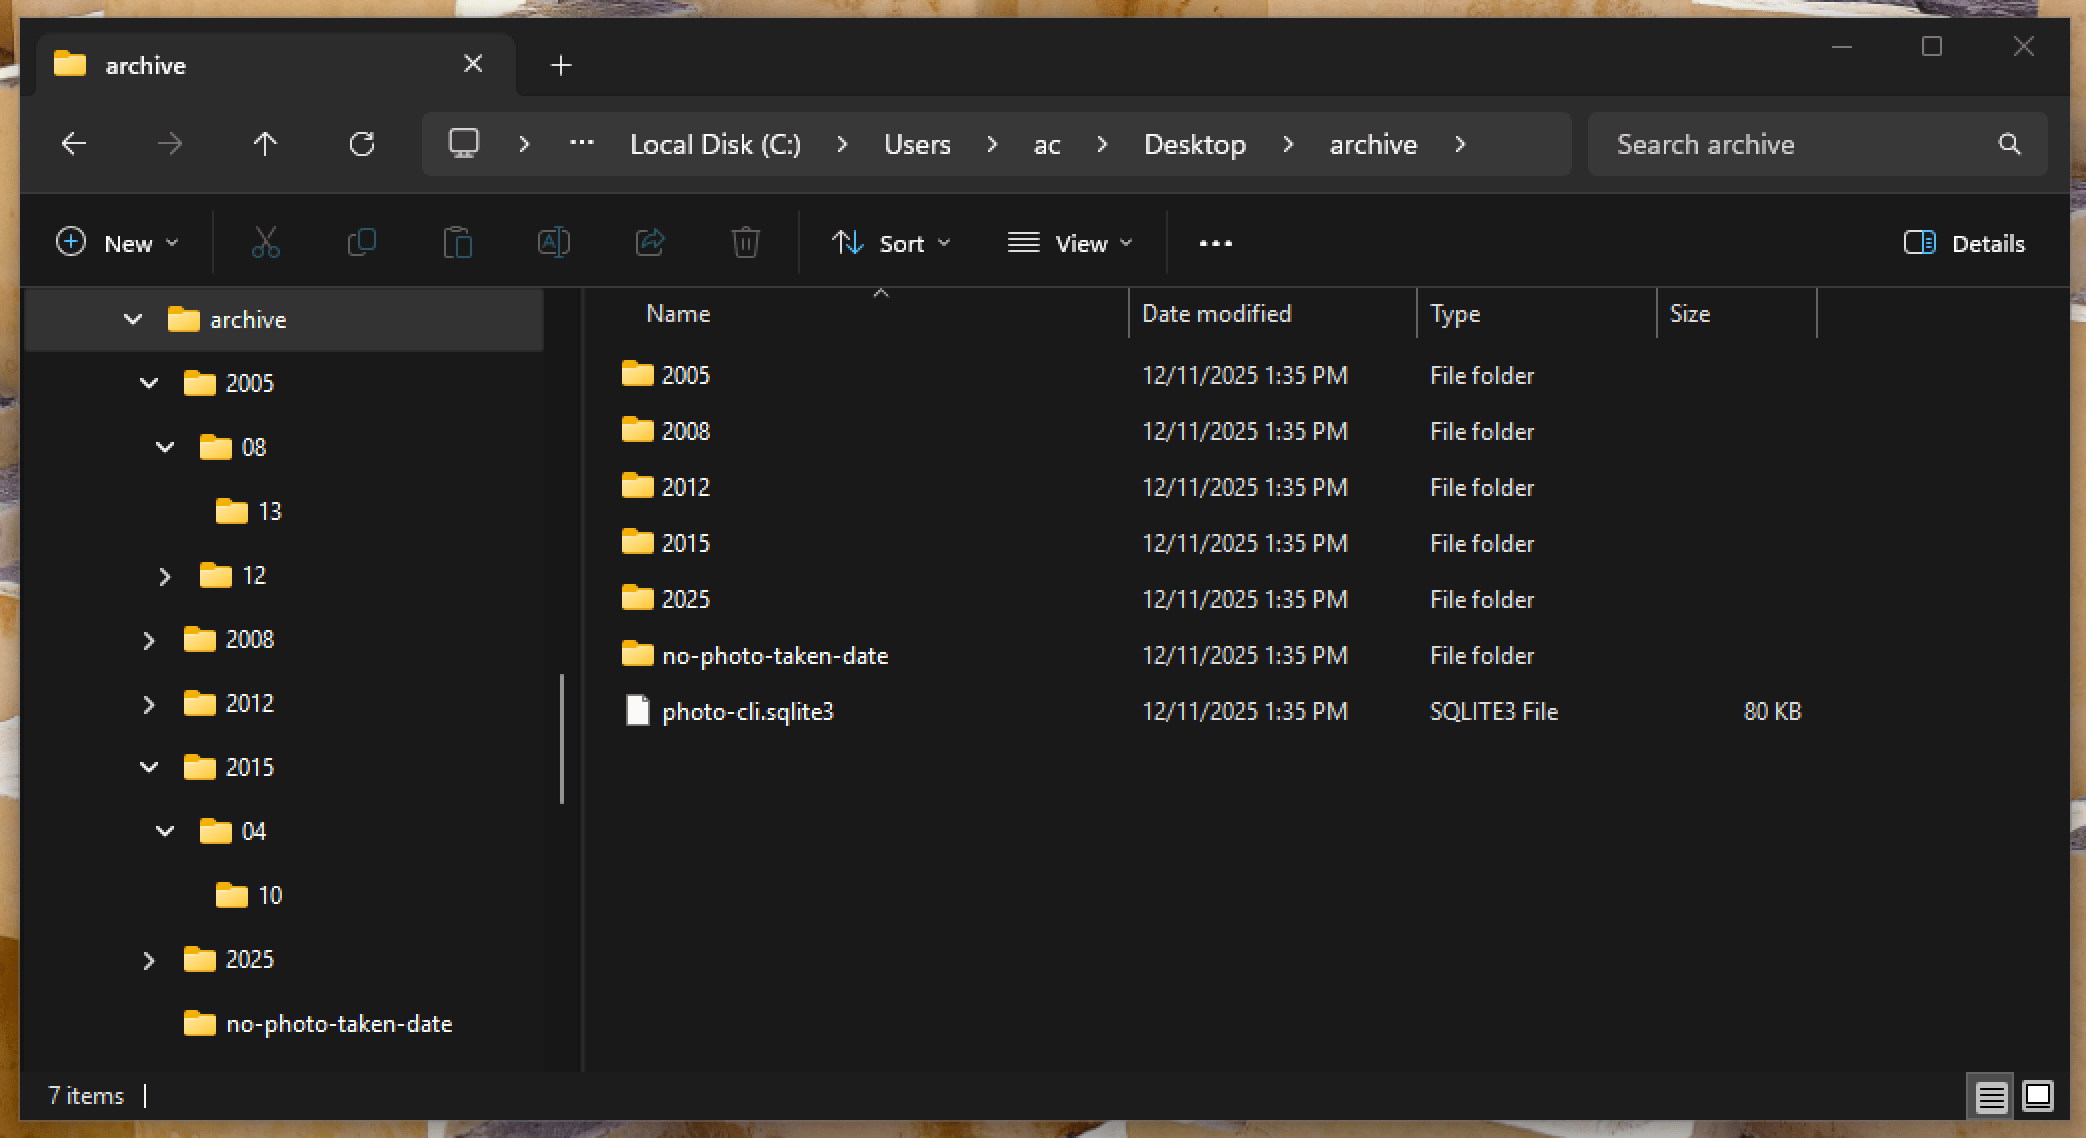
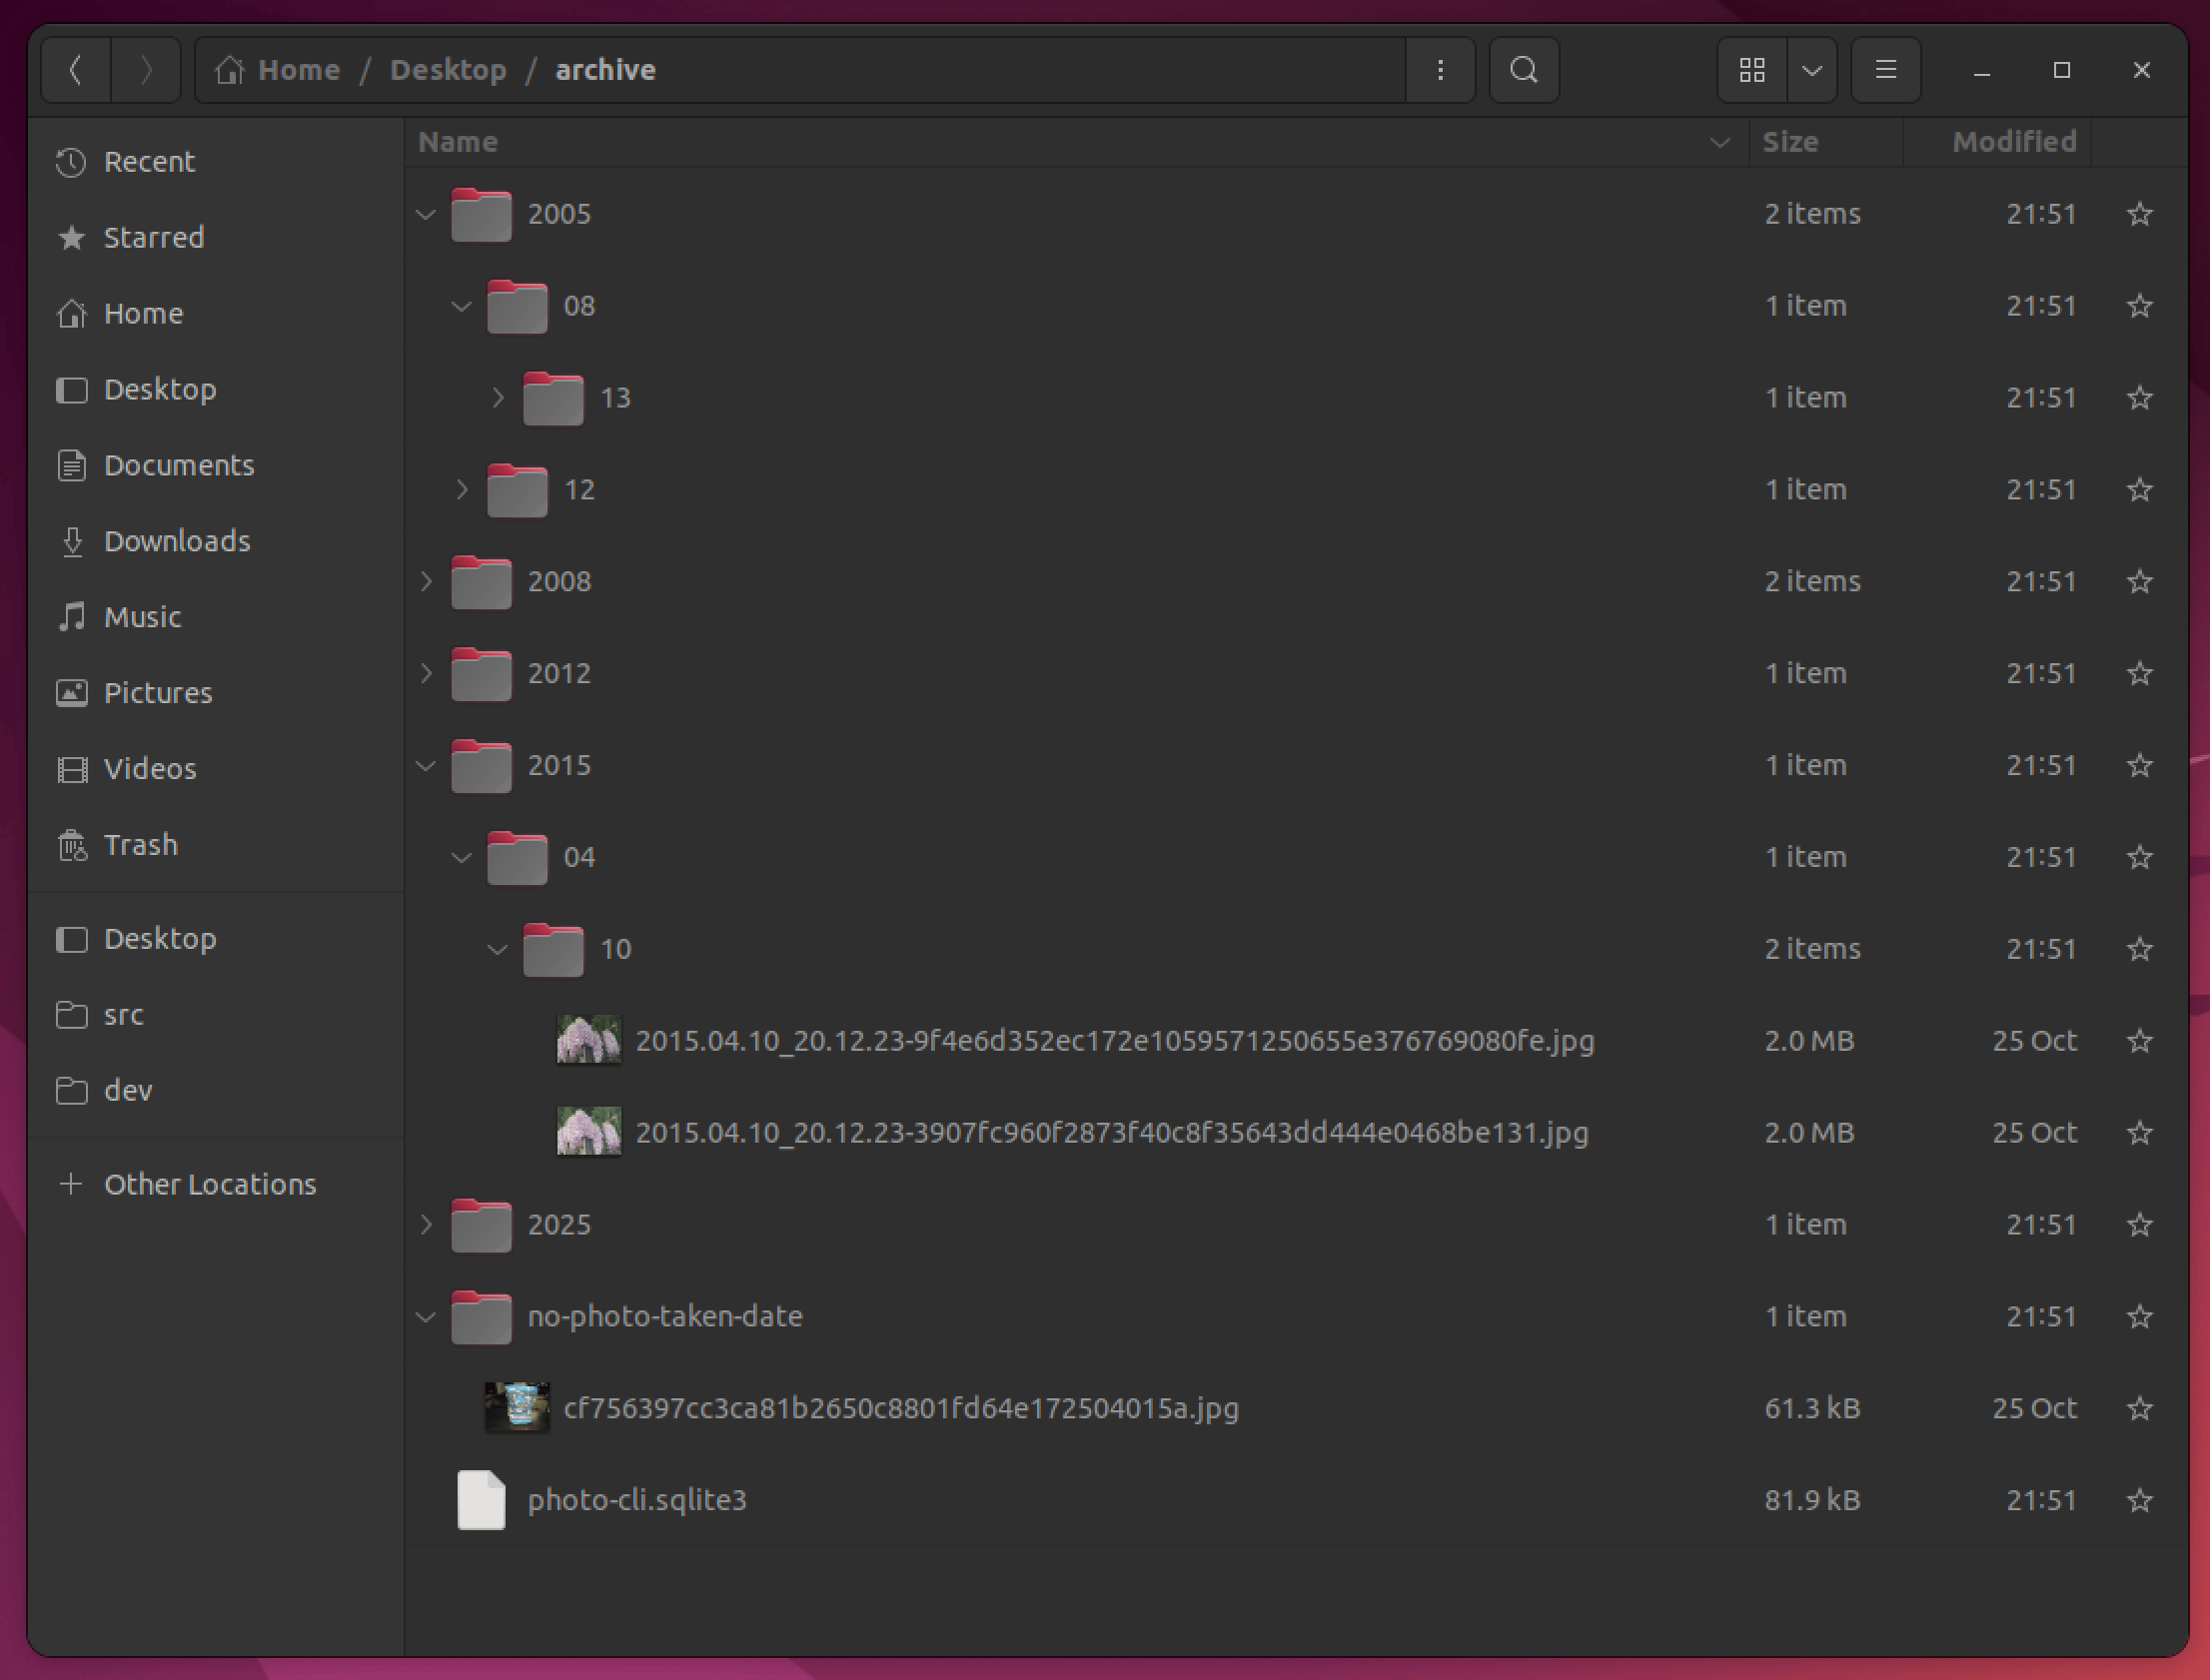
[year]/[month]/[day]/ with SHA1-stamped names — so the same archive folder can be safely re-targeted by future archive runs. New photos slot in cleanly, and any duplicate of a previously archived photo is detected and skipped.How it looks across platforms
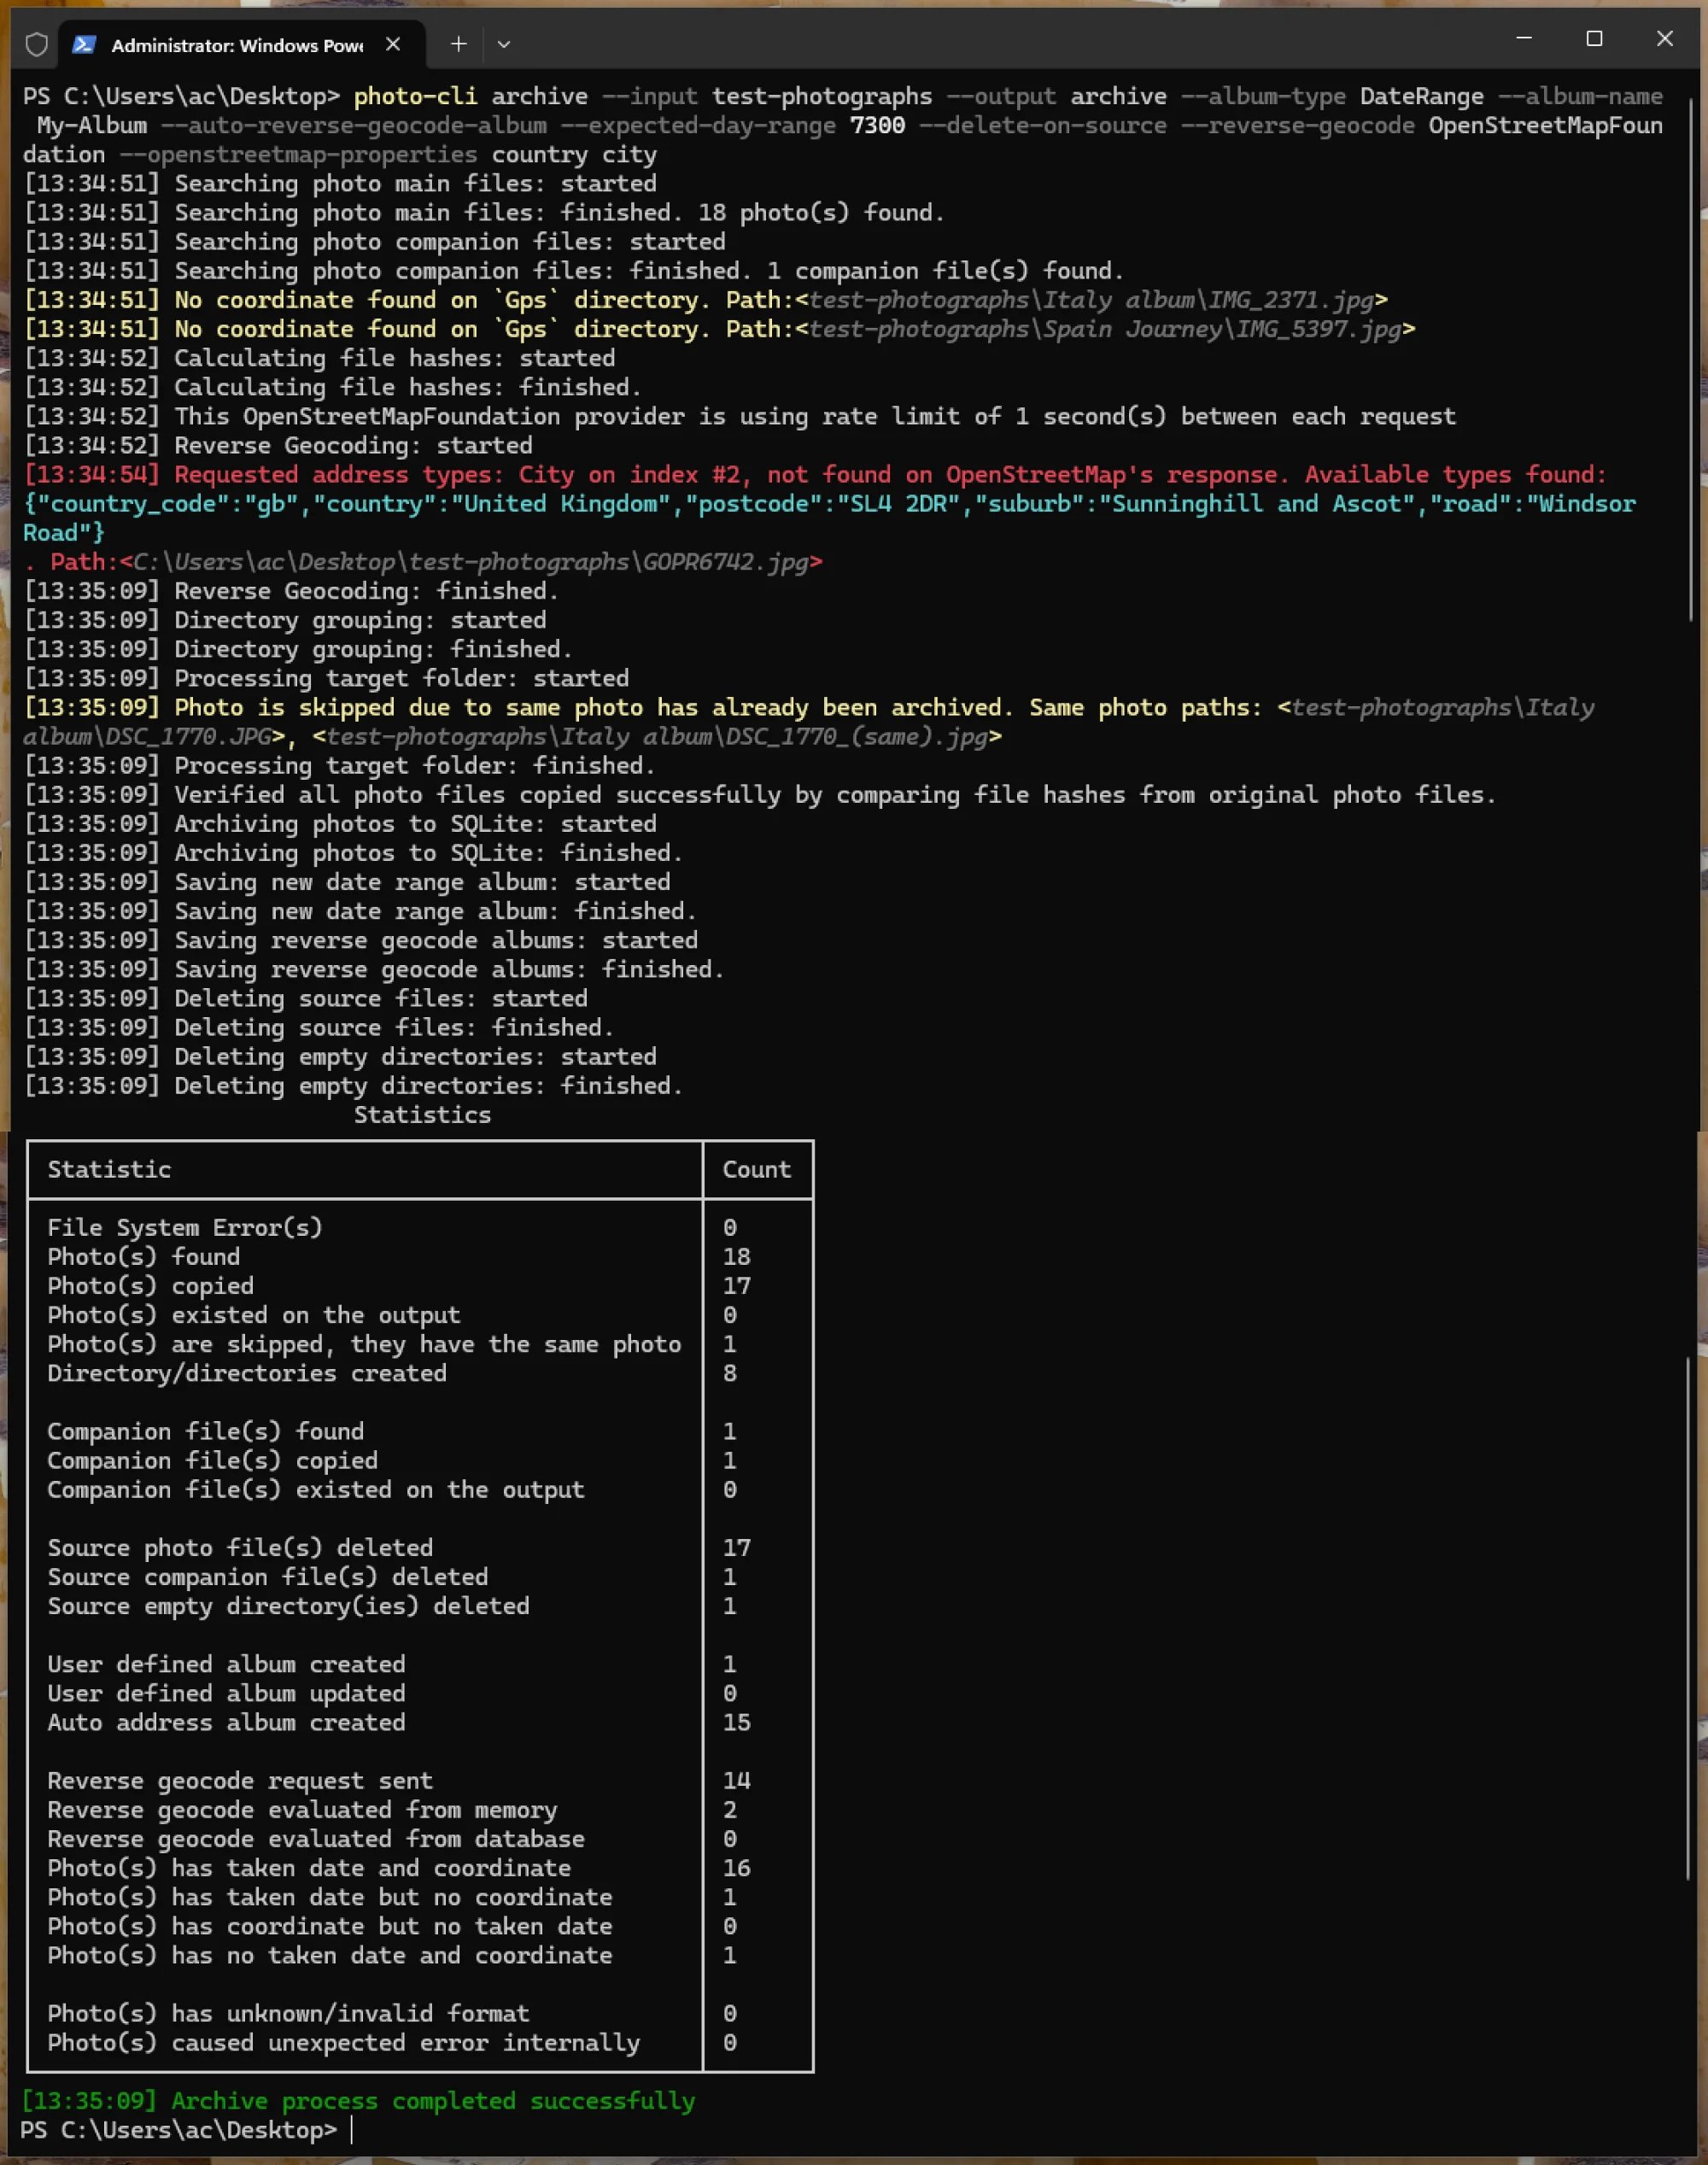
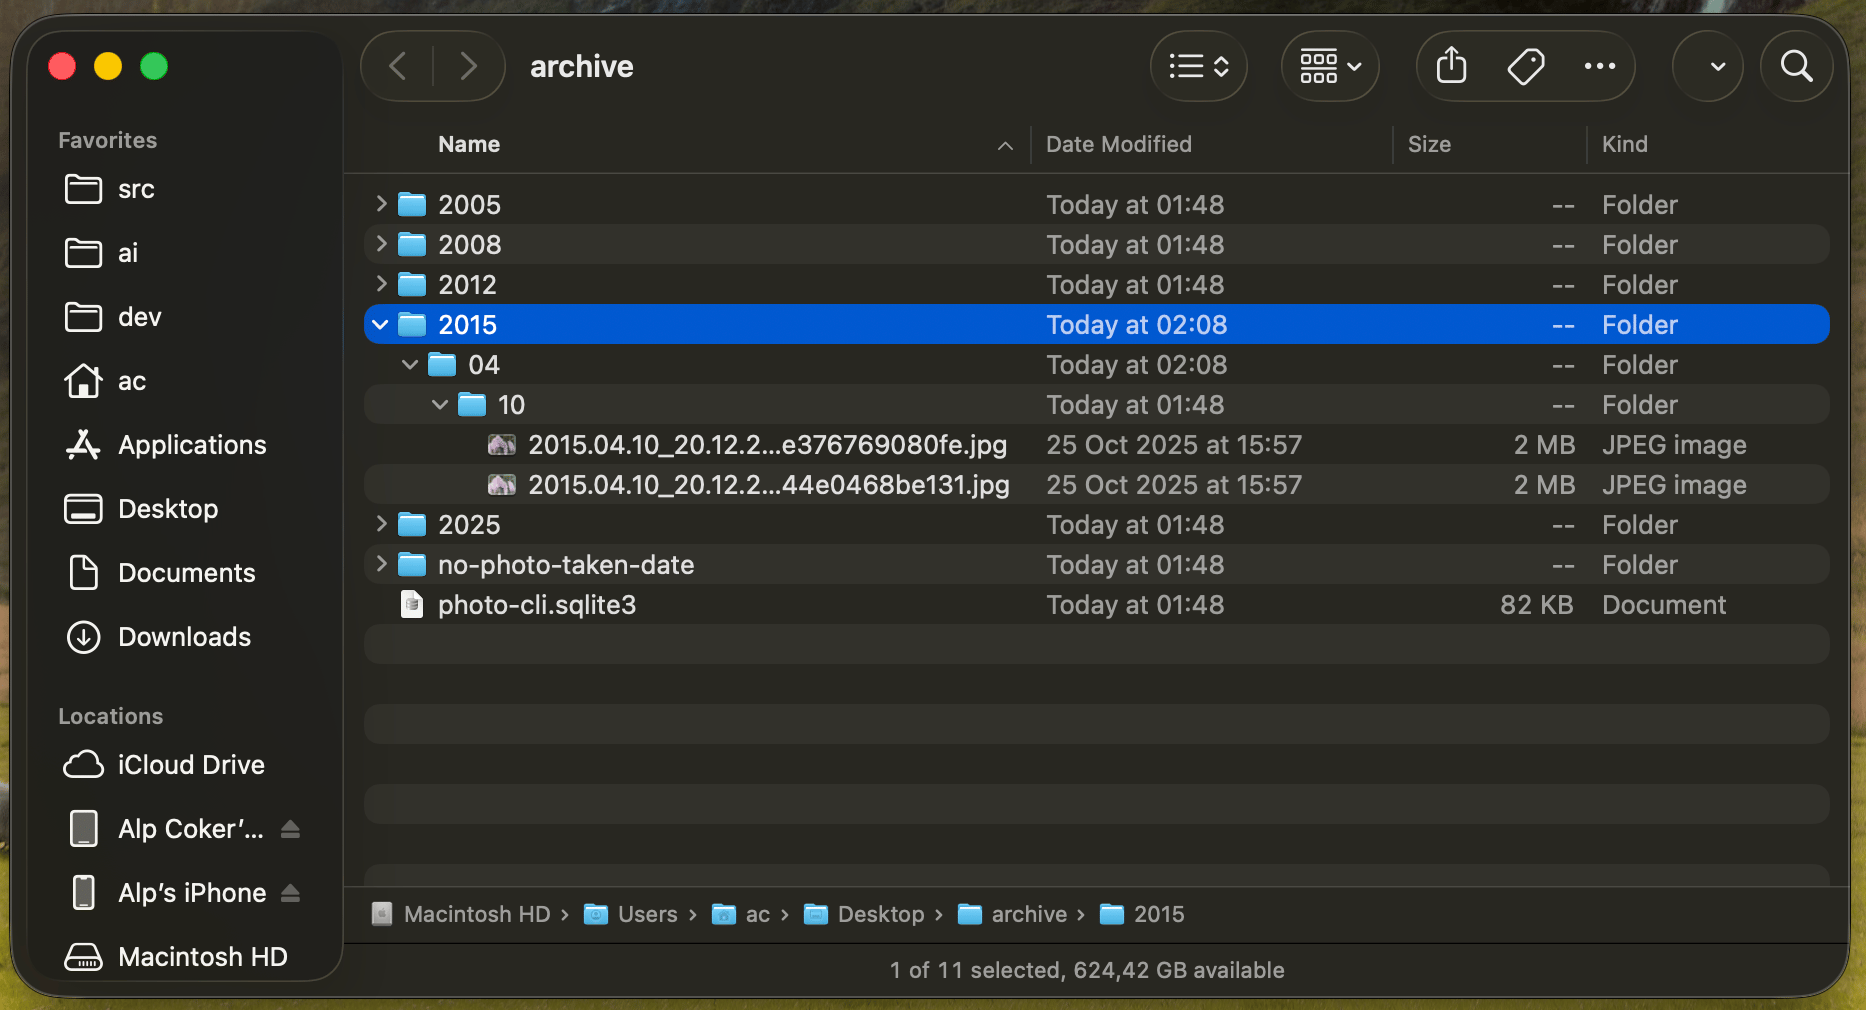
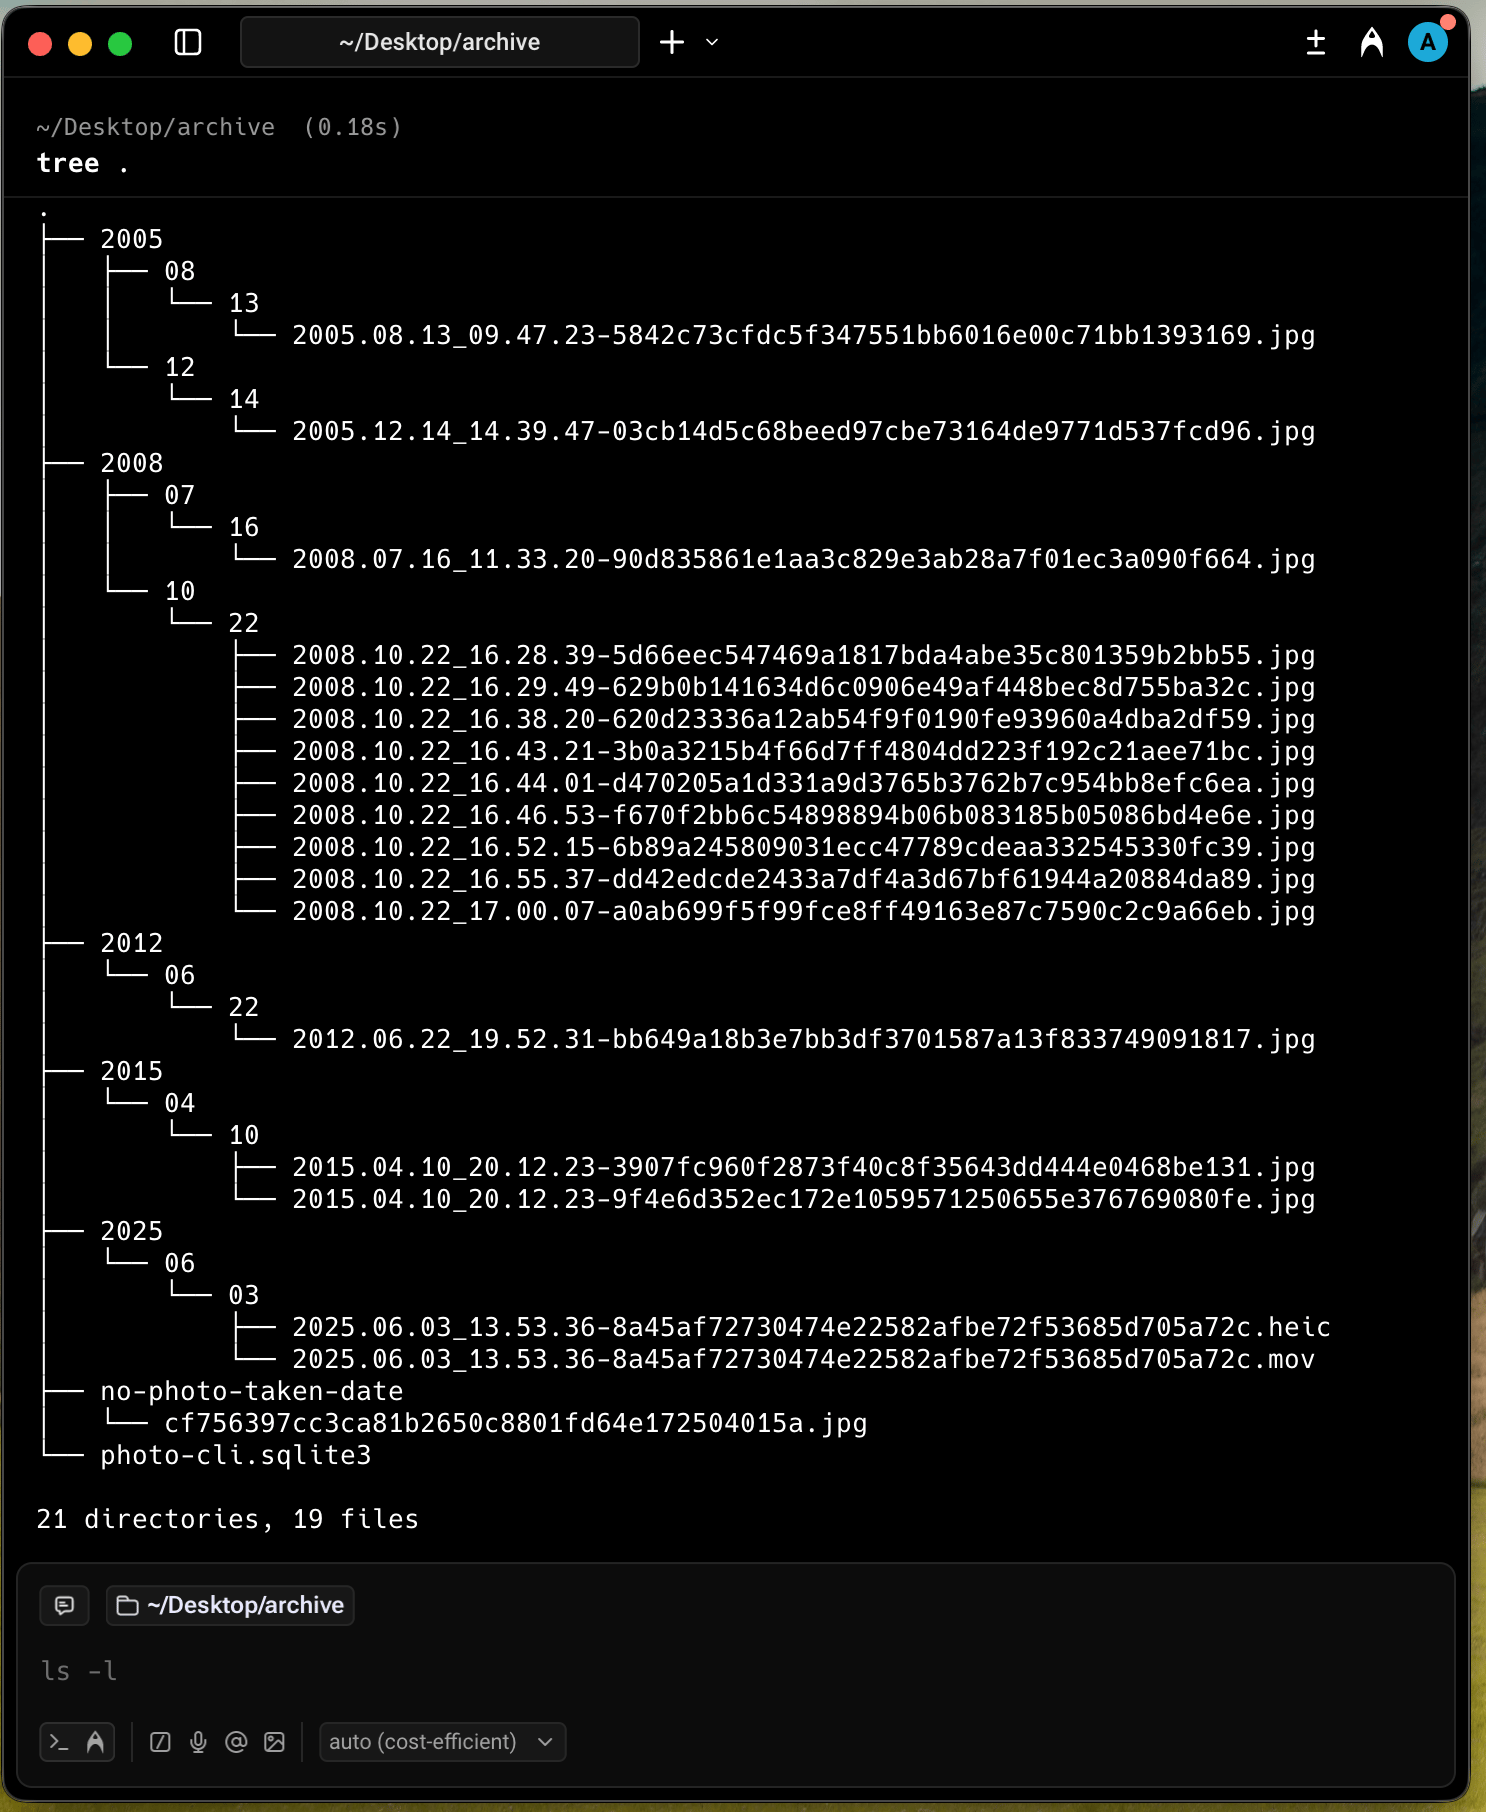
The samearchive command runs on macOS, Windows, Linux, and inside a container. Each tab shows the terminal executing the command, the resulting folder in the native file manager, and a tree listing of the archive.
- macOS
- Windows
- Linux
- Container
2. Copy into a new organized folder
Thecopy command is the flexible one. Unlike archive, it is configurable end-to-end: you choose the folder structure, the file naming style, whether to flatten or preserve the original hierarchy, what to do with photos missing a date or GPS, and whether to verify the copy. See the copy command reference and the examples gallery for more strategies.
Run the command
Before and after
Before — the test photo set above. After —photo-cli-test/:
What happened, step by step
--process-type SubFoldersPreserveFolderHierarchykeeps the same folder layout as the source —Italy album/staysItaly album/,Spain Journey/staysSpain Journey/.--folder-append DayRange --folder-append-location Prefixprefixes each subfolder with the earliest and latest photo dates inside it:Italy albumbecomes2005.12.14-2025.06.03-Italy album.--naming-style DateTimeWithSecondsAddressrenames every photo with its taken date plus its reverse-geocoded address:GOPR6742.jpgbecomes2012.06.22_19.52.31-United Kingdom.jpg.--number-style PaddingZeroCharacterappends-1,-2, … when two photos share the same timestamp-and-address — that is why both Spain photos and both 17:00:07 Italy photos get a numeric suffix.- Reverse geocoding uses OpenStreetMap with the
country citylevels (see building your address). --no-coordinate InSubFolder/--no-taken-date InSubFolderkeeps photos that are missing data —IMG_2371.jpg(no GPS) lands inItaly album/no-address/,IMG_5397.jpg(no GPS, no date) lands inSpain Journey/no-address-and-no-photo-taken-date/.--verifyre-hashes every copied file against its source, then writes the per-file SHA1 list tosha1.lstso you can re-verify later withsha1sum --check sha1.lst.photo-cli-report.csvis written into the output folder. It lists every photo’s original path, new path, taken date, formatted address, latitude/longitude, and the individual address levels — see the example below.
Console output
Full progress log and statistics table
Full progress log and statistics table
3. List or open photos by their metadata
Once you have an archive (from feature 1), thelist command can query the SQLite database to find or open photos by date, location, or album. See the list command reference for every filter.
Open every photo from October 2008
Inspect the albums that were created
If you ran the archive command in feature 1 with--auto-reverse-geocode-album, every geocoded level became its own album. List them with:
--type PhotosByAlbumName --album-name 'Italia-Firenze', for example.
4. Query your photo archive with AI assistants over MCP
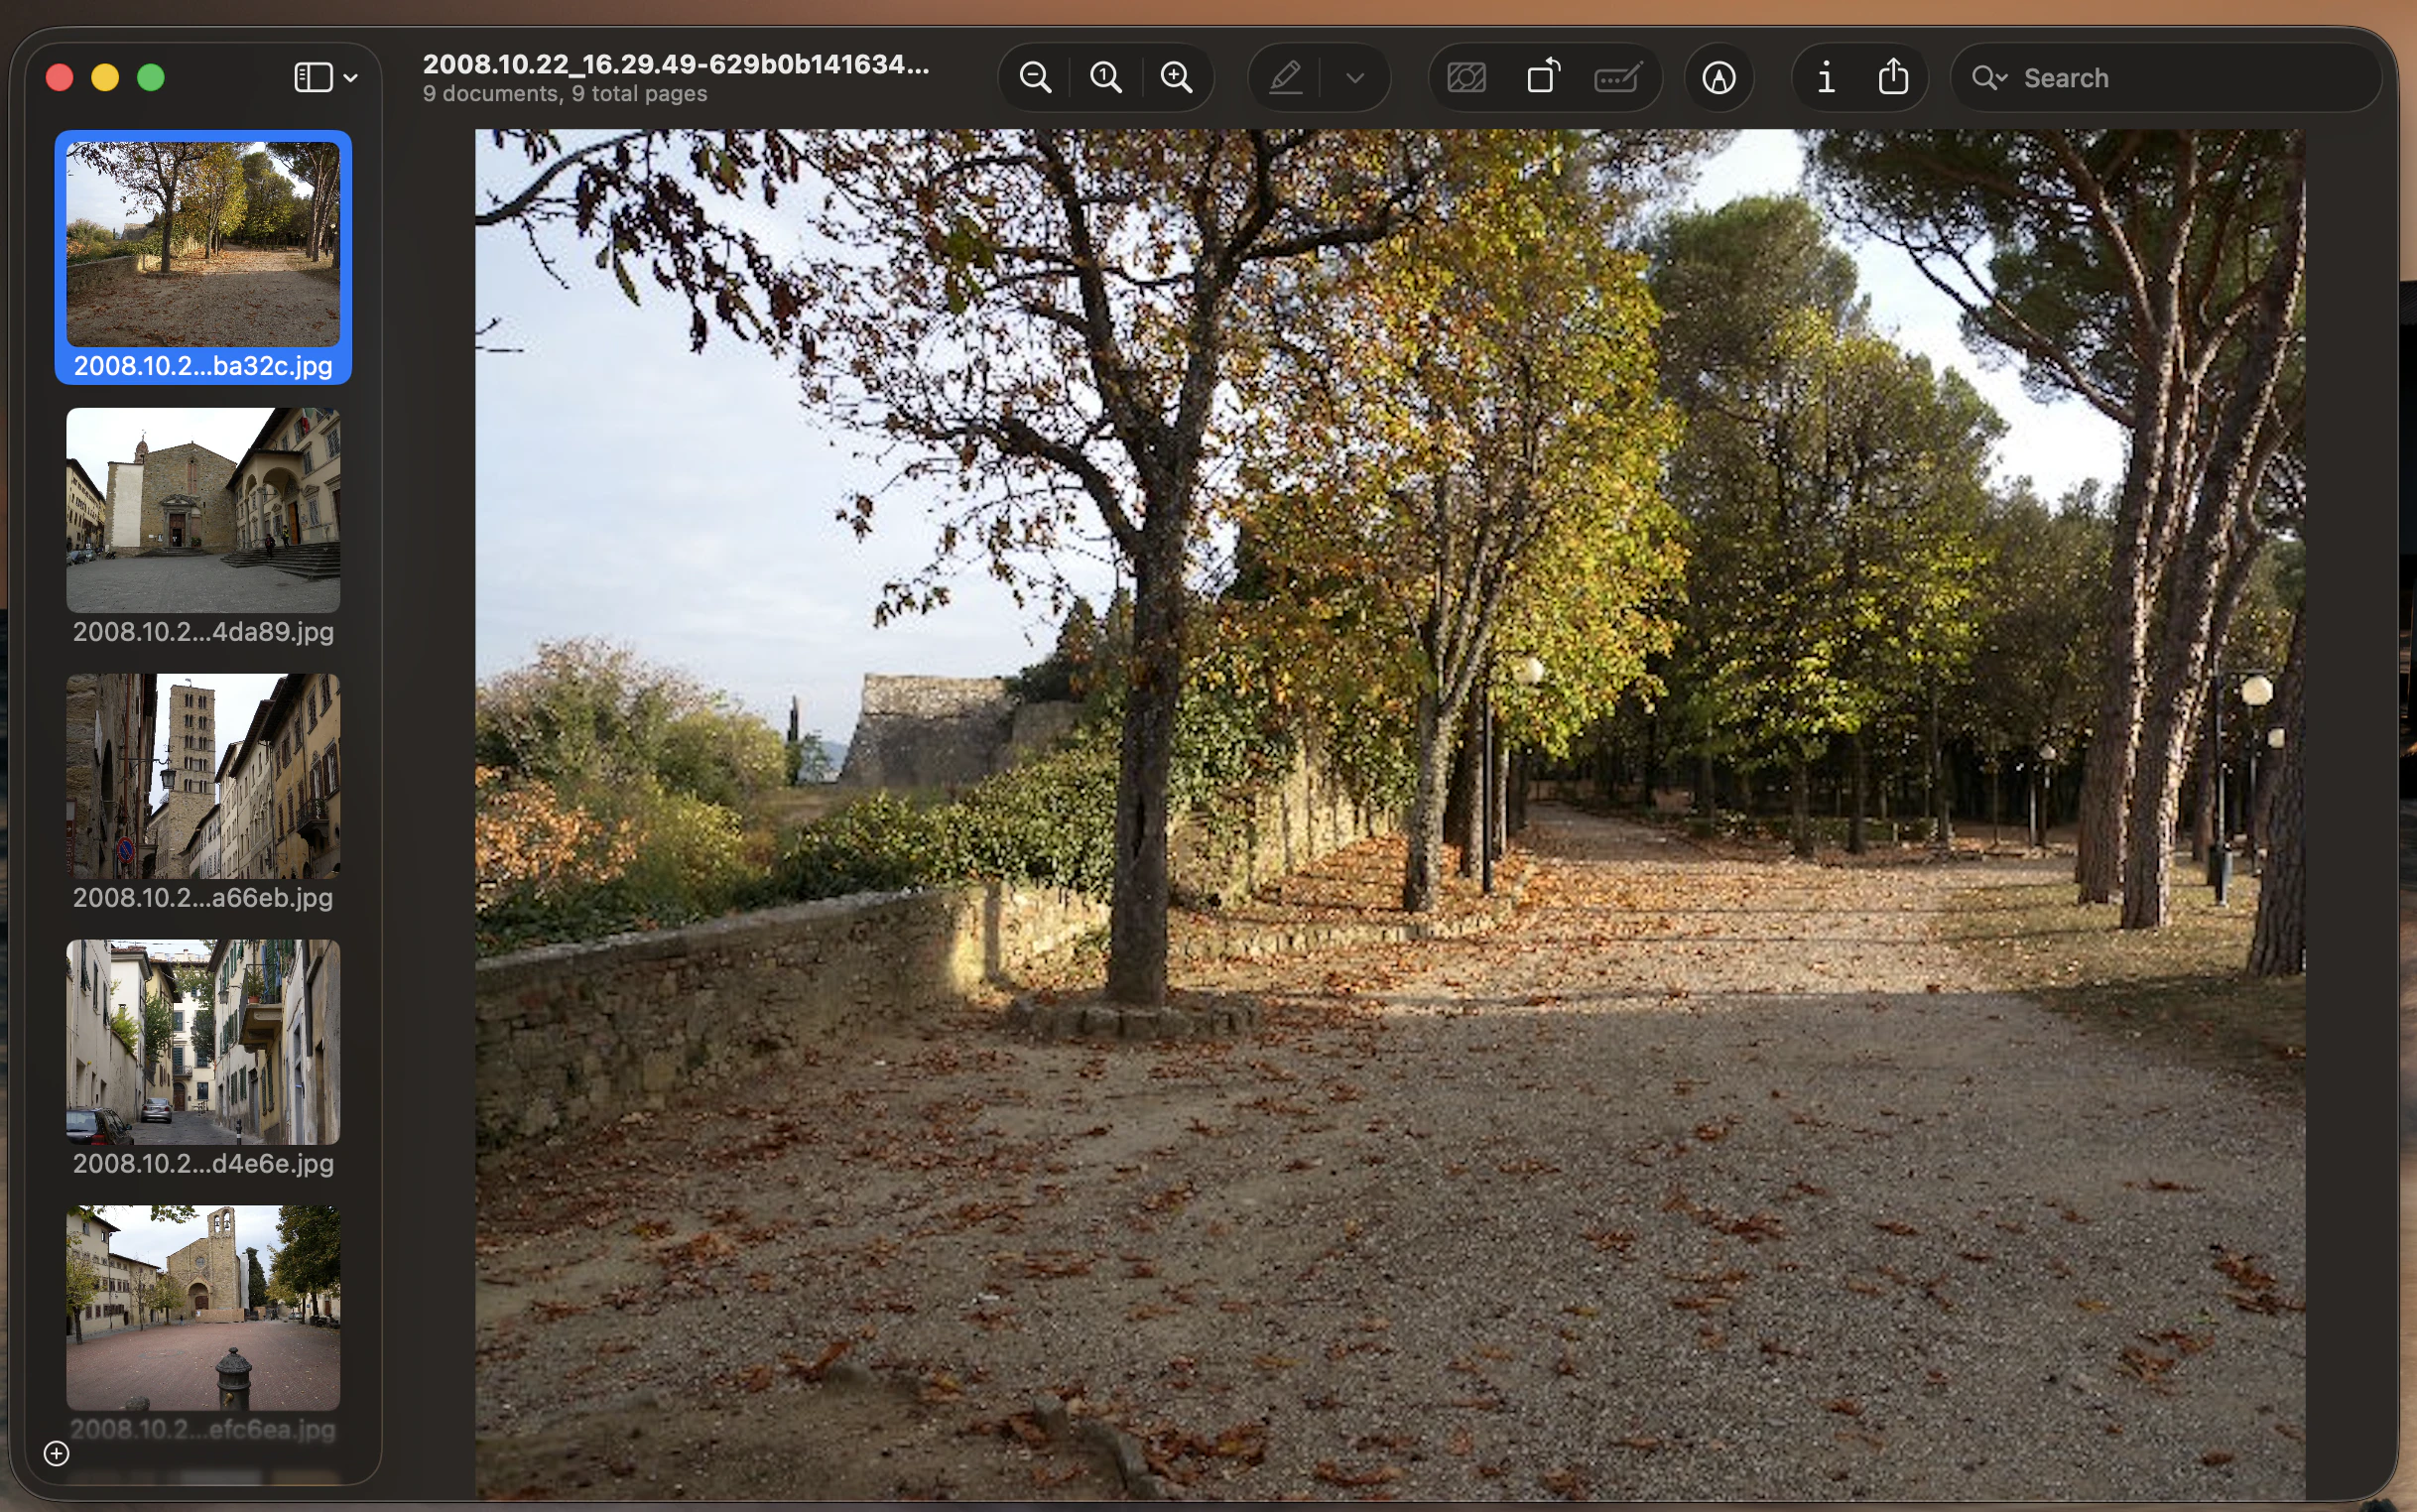
Themcp command starts a Model Context Protocol stdio server that exposes your archive’s SQLite database to AI assistants. Once connected, tools like Claude Code, Claude Desktop, and VS Code can search by date, location, album, or proximity to a GPS coordinate — and on macOS, open matching photos directly in Preview. See the mcp command reference for the full tool list and per-client setup.
Run the command
photo-cli.sqlite3. You usually don’t run it by hand — your AI client launches it from its MCP config.
Ask the assistant in plain language
Once connected, ask questions like “What cities and when did I go to Italy?”, “Show me everything taken within 5 km of 43.78, 11.23”, or “Open all photos in the Italia-Firenze album”. The assistant picks the right MCP tool, fills in the parameters, and photo-cli answers from the SQLite index.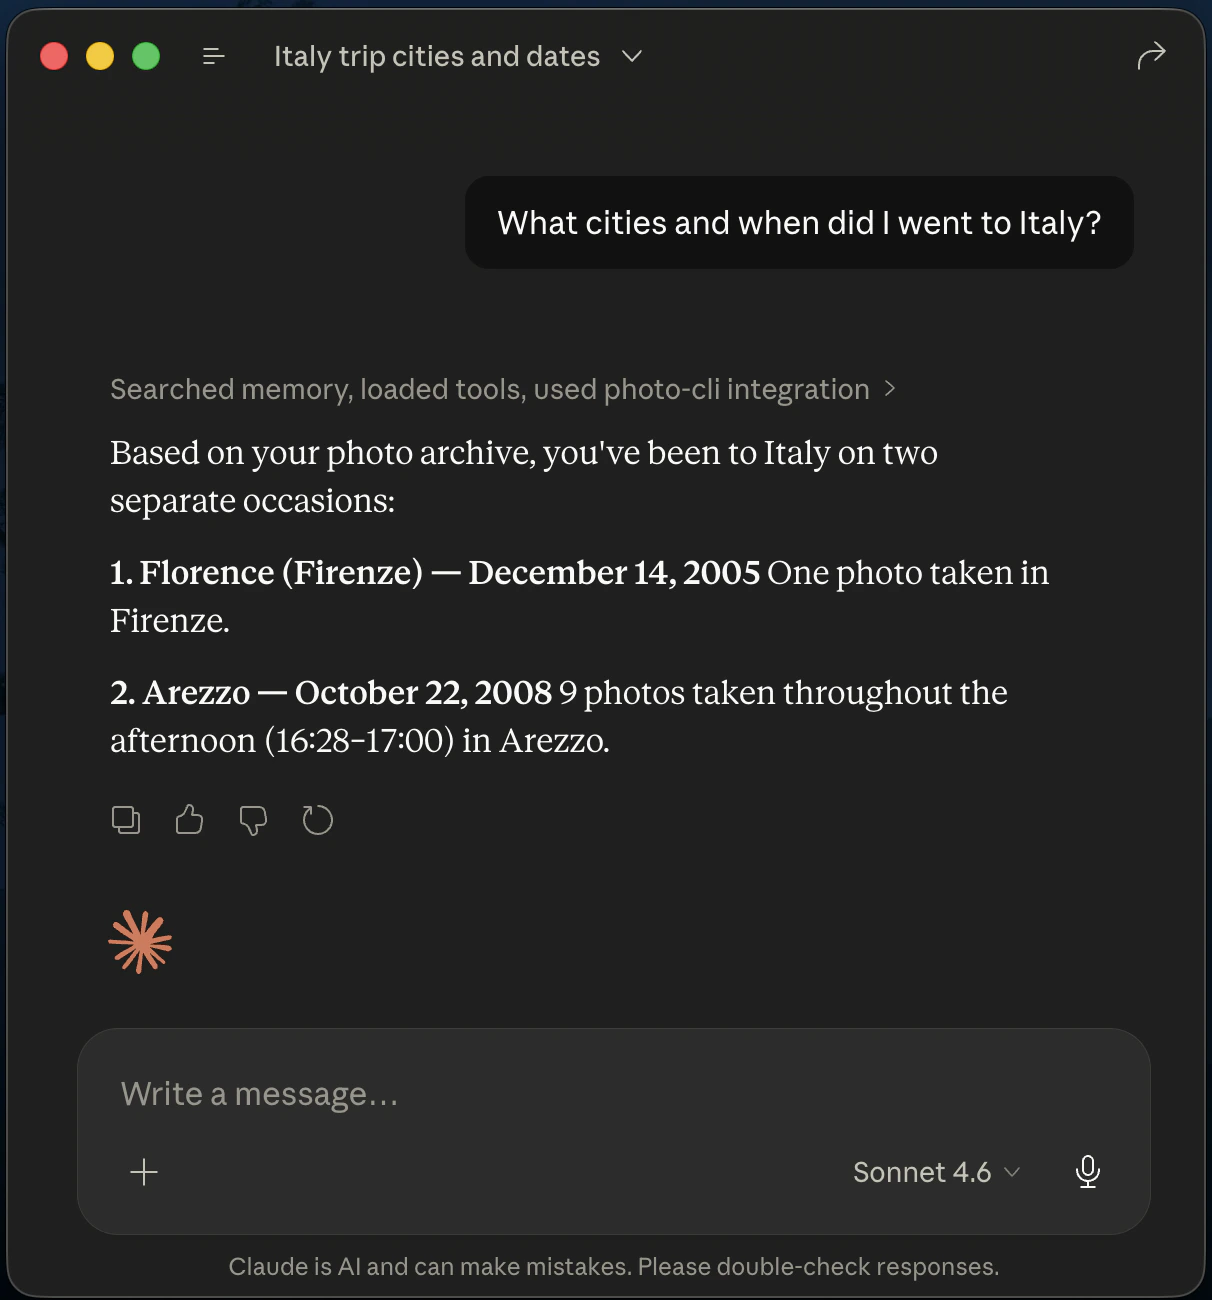
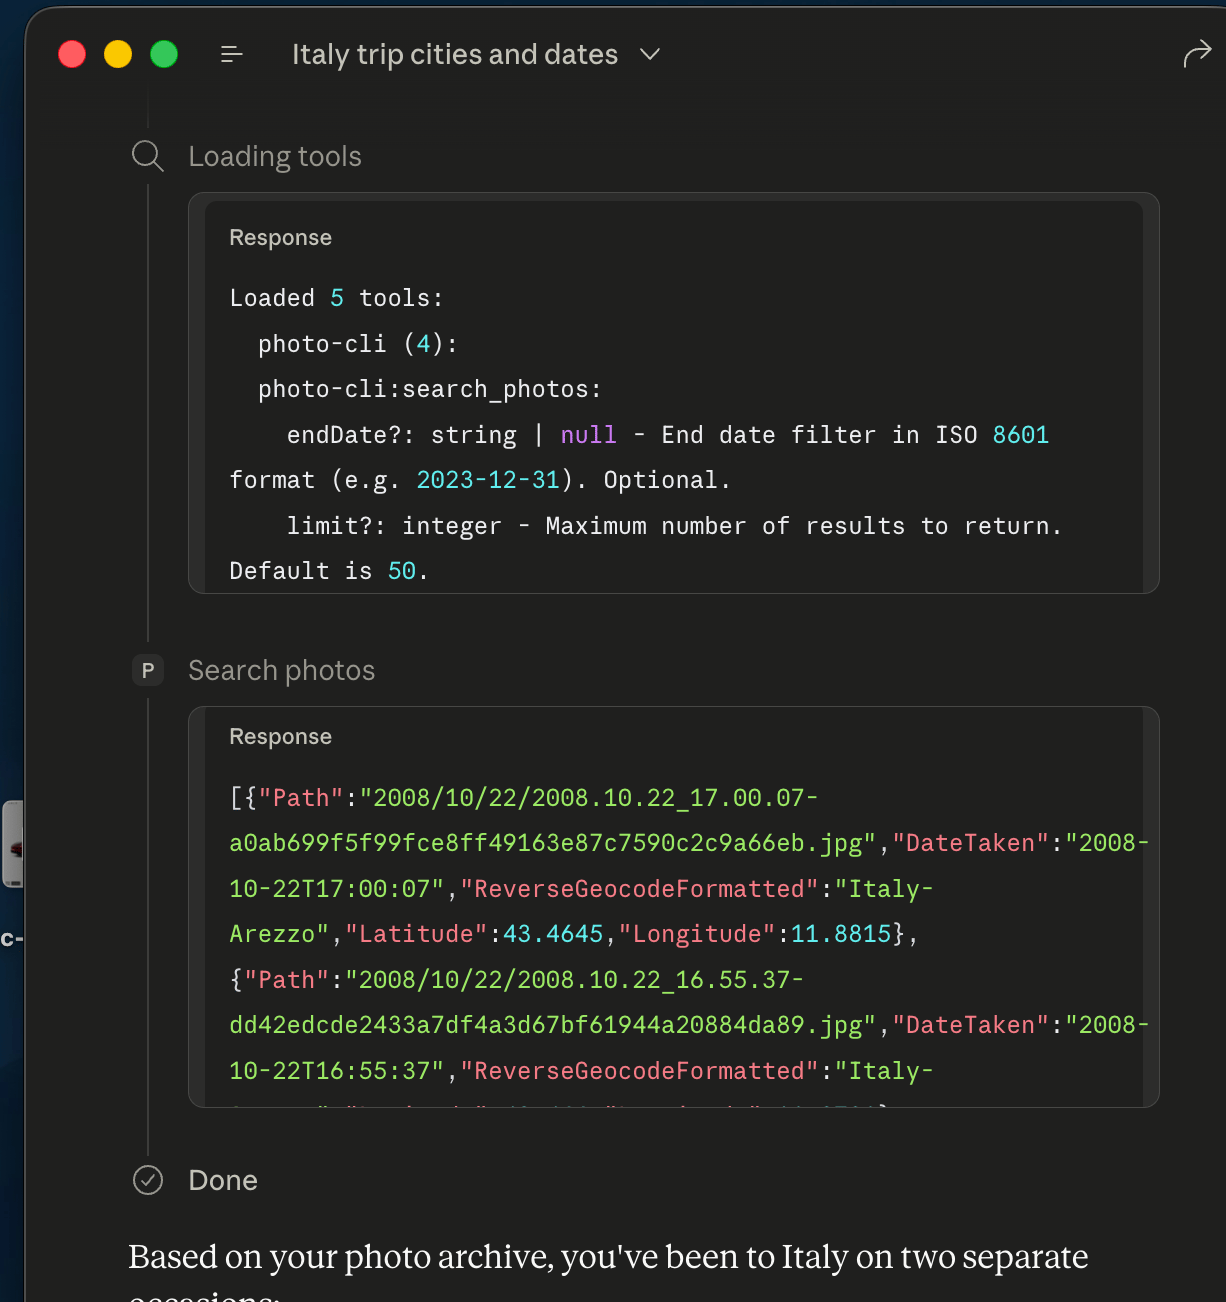
How tools map to the SQLite index
Each exposed MCP tool is a typed query against the archive database —list_photos_by_date_range, find_near_location, list_albums, open_photos_by_album_name, and so on. The MCP Inspector view below shows the available tools and their input schemas, which is exactly what the assistant sees when deciding how to answer your question:
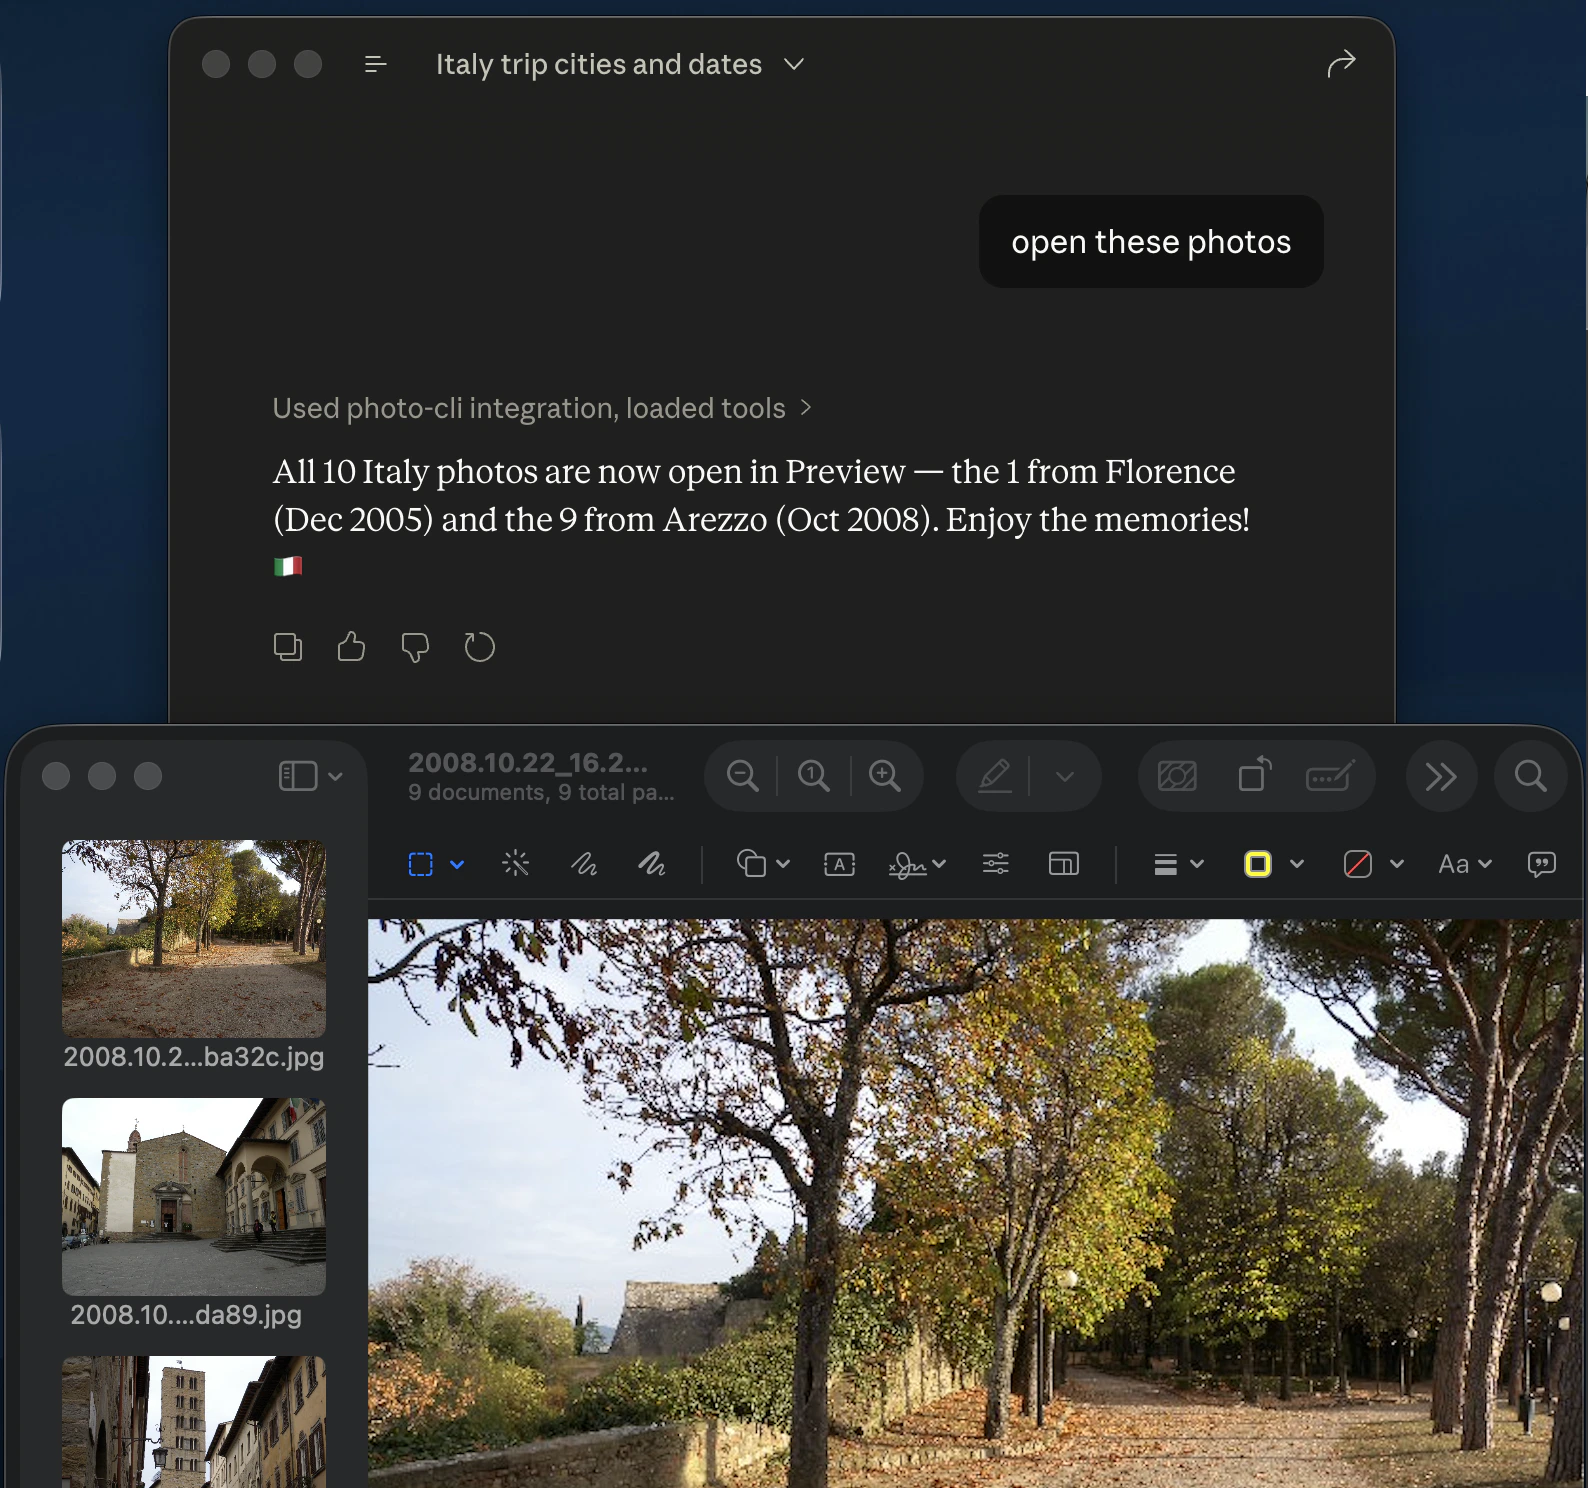
Open the matching photos from the assistant
When you ask the assistant to open photos rather than just list them, the MCP server hands the matching files off to your OS image viewer. This is wired up for macOS today — matches open directly in Preview. On Linux and Windows theopen_photos_* tools are not active yet; use the list_photos_* tools and pipe the returned paths to your viewer of choice.
5. Export every photo metadata to a CSV report
Theinfo command does no copying at all. It scans a folder, extracts the EXIF data, optionally reverse-geocodes, and writes a single CSV report you can open in Excel, Numbers, LibreOffice, or Google Sheets. See the info command reference.
Run the command
--no-taken-date Continue and --no-coordinate Continue mean photos missing data still appear in the report — just with empty cells in the affected columns.
A few rows from the resulting photo-info.csv
| PhotoPath | PhotoDateTaken | ReverseGeocodeFormatted | Latitude | Longitude | Address1 | Address2 | Address3 |
|---|---|---|---|---|---|---|---|
/TestImages/DSC_5727.jpg | 08/13/2005 09:47:23 | Kenya | -0.3713 | 36.0564 | Kenya | ||
/TestImages/GOPR6742.jpg | 06/22/2012 19:52:31 | United Kingdom-Ascot-Sunninghill and Ascot | 51.4248 | -0.6736 | United Kingdom | Ascot | Sunninghill and Ascot |
/TestImages/Italy album/DSC03467.jpg | 12/14/2005 14:39:47 | Italia-Firenze-Quartiere 1 | 43.7856 | 11.2346 | Italia | Firenze | Quartiere 1 |
/TestImages/Italy album/IMG_2371.jpg | 07/16/2008 11:33:20 | ||||||
/TestImages/Spain Journey/DSC_1807.jpg | 04/10/2015 20:12:23 | España-Madrid | 40.4470 | -3.7248 | España | Madrid | |
/TestImages/Spain Journey/IMG_5397.jpg |
Address4..Address8 for deeper administrative levels.
Console output
Full progress log and statistics table
Full progress log and statistics table
6. Navigate your photo locations on Google Maps-Earth
Both thecopy and info commands produce a CSV with a row per photo and lat/long columns. That CSV can be imported directly into Google’s mapping tools to navigate your photos on a real map.
Google My Maps
Open Google My Maps and click Create a new map, then import the CSV onto a layer. You get a pin per photo, customizable by label and style.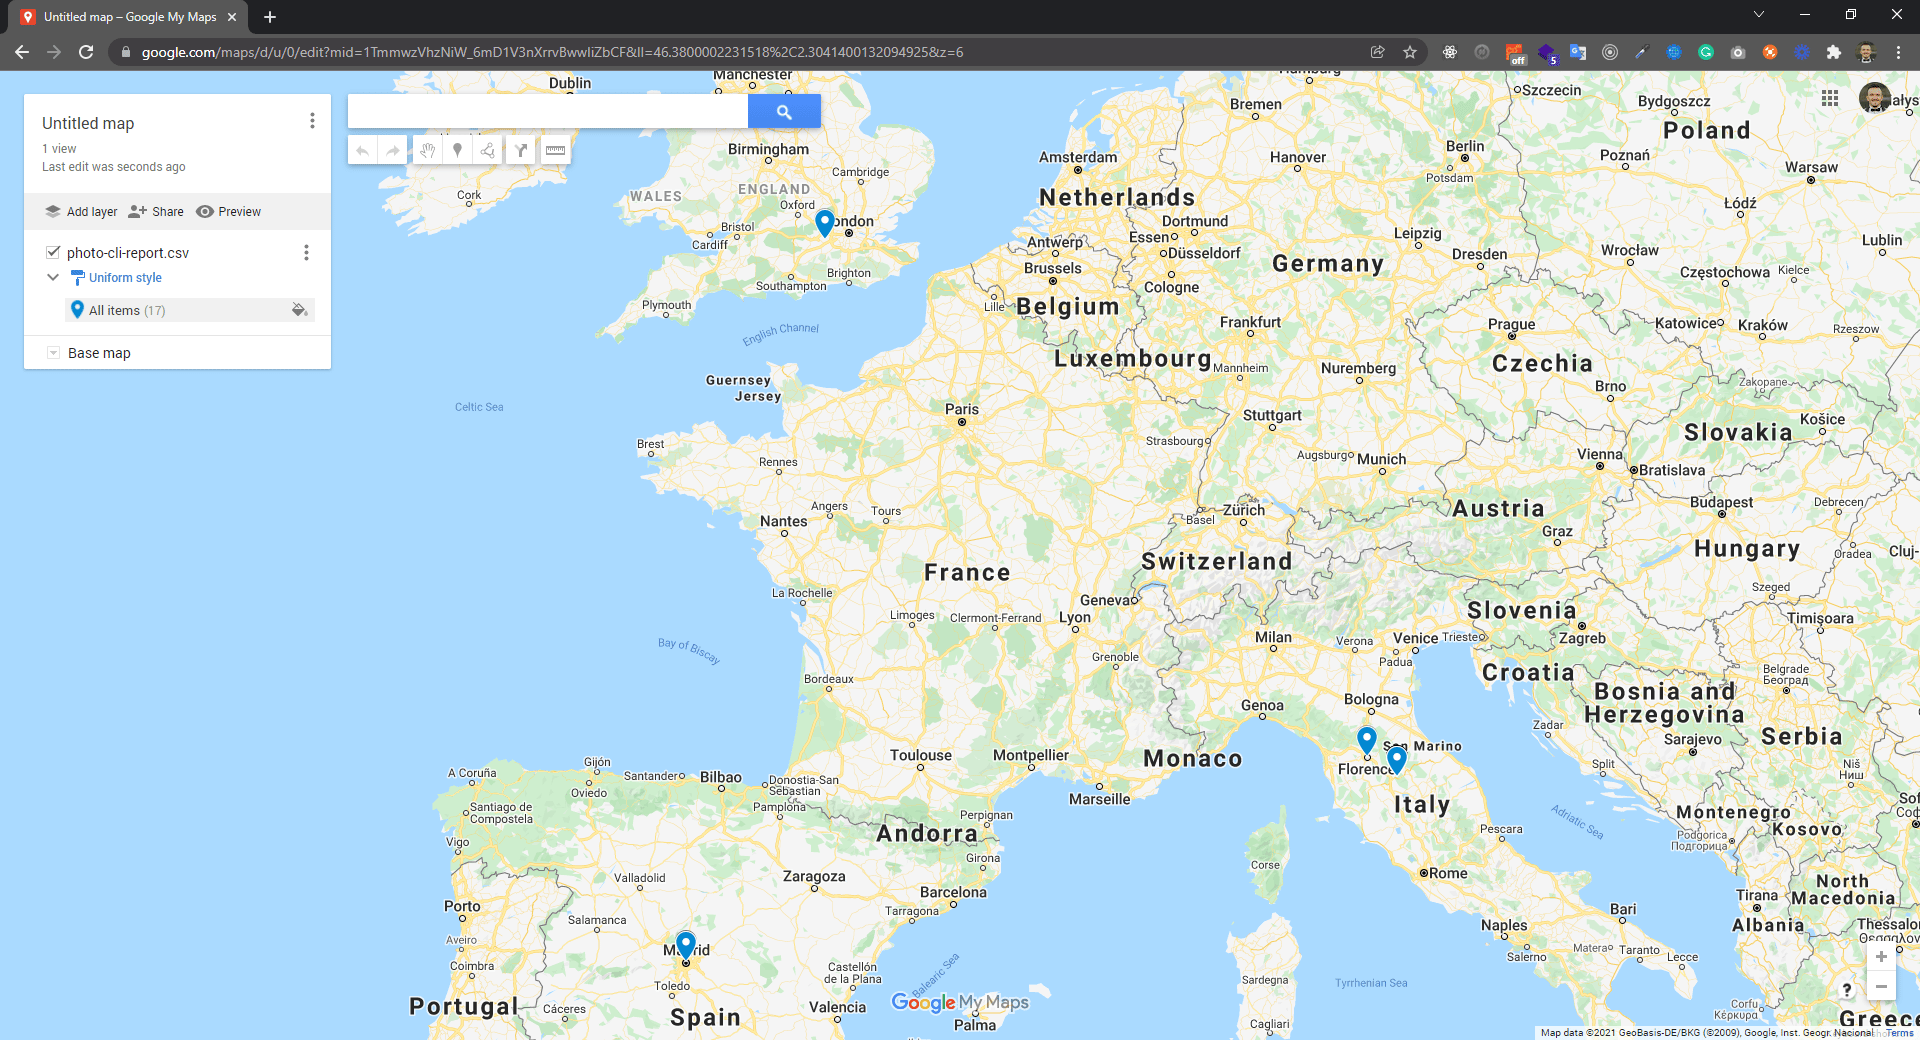
Google Earth Desktop
Install Google Earth Desktop and use the File → Import menu to load the CSV. Save it as KML/KMZ to share or to use it on the web version.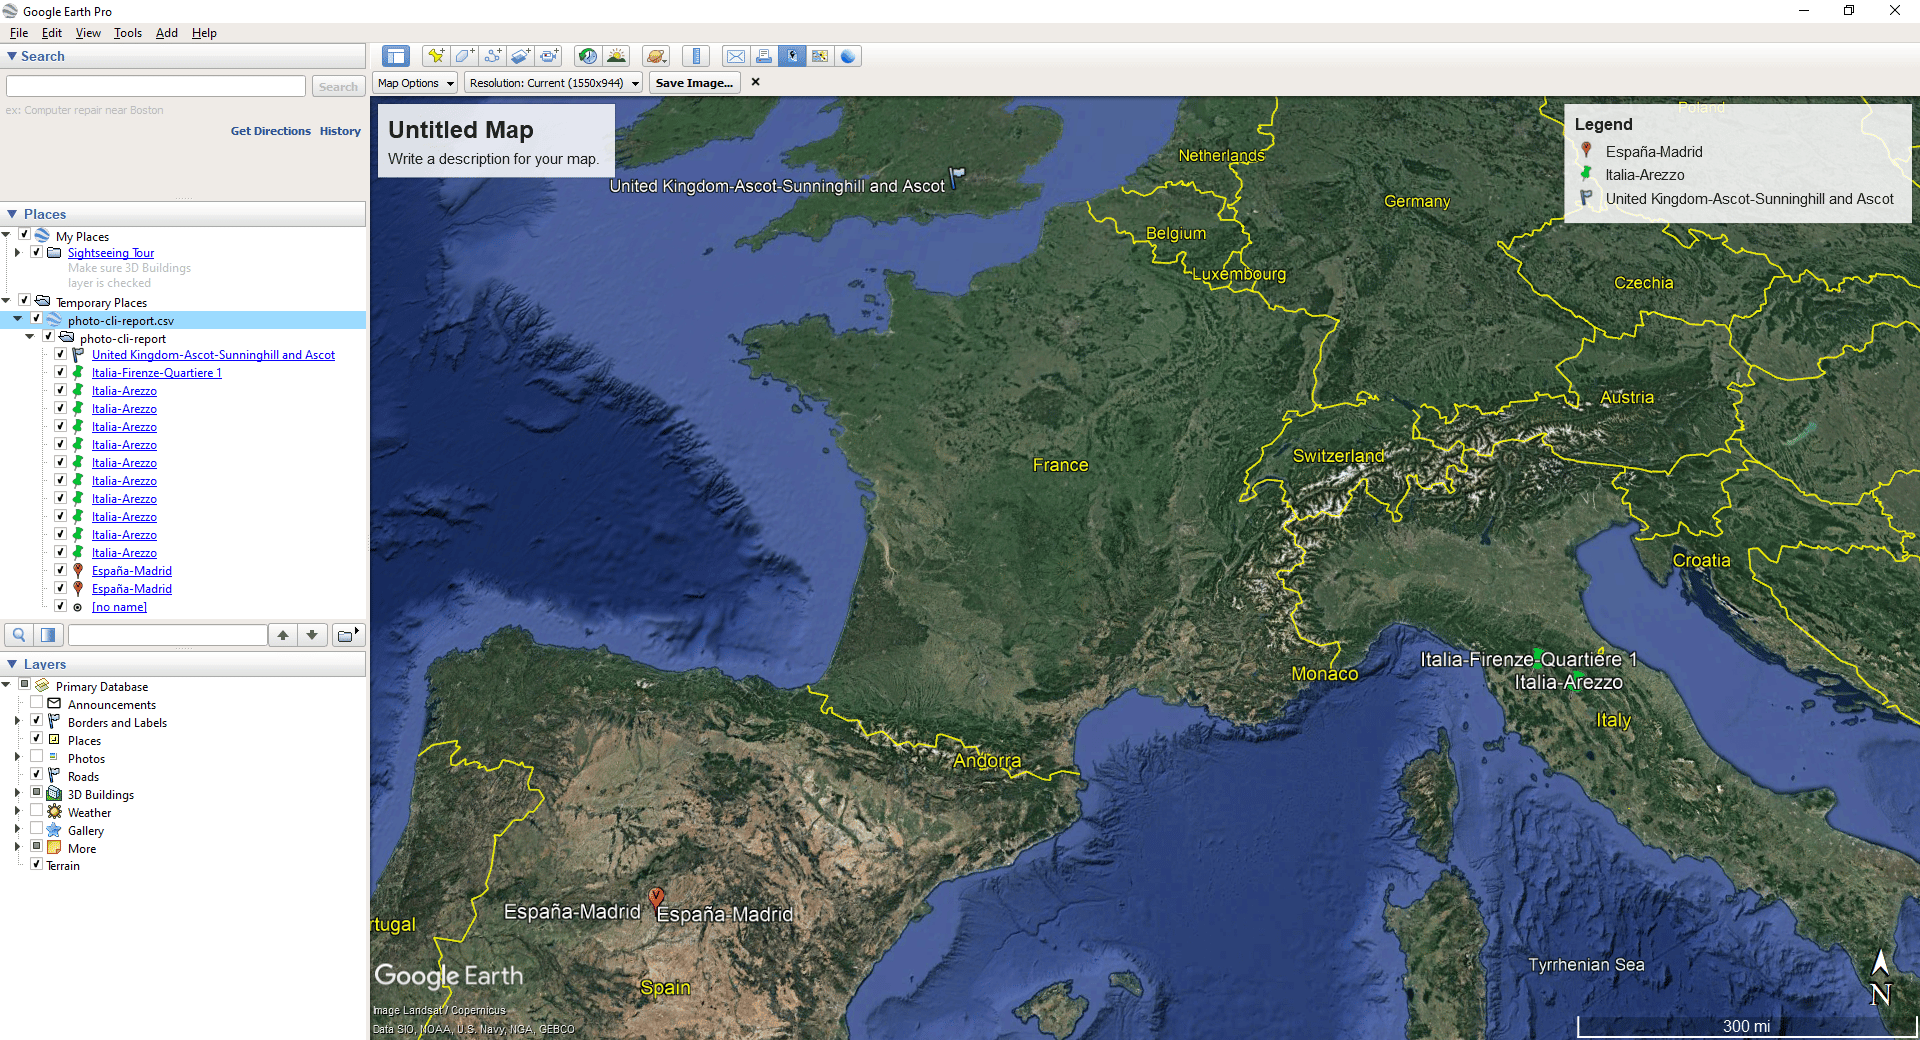
Google Earth Web
Earth Web doesn’t import CSV directly — first export a KML/KMZ from Earth Desktop, then create a project and add the KML file to it.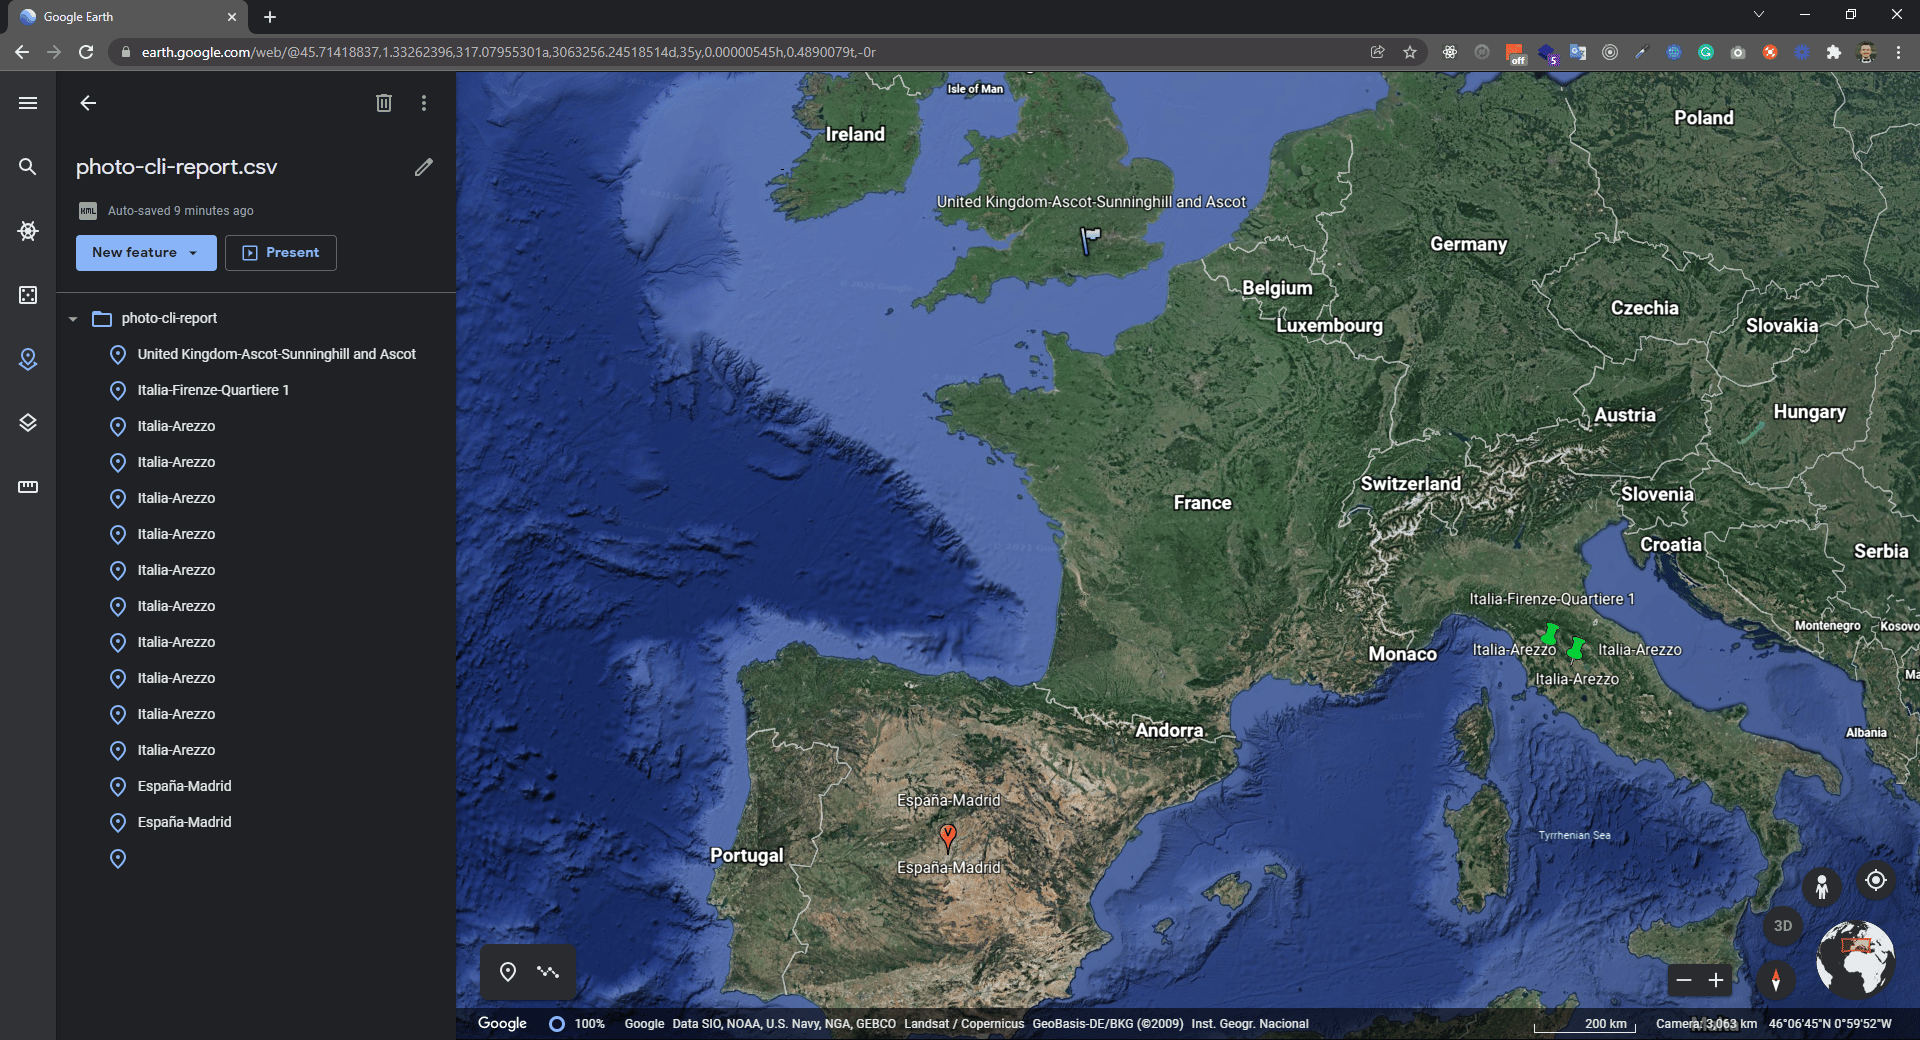
Core commands
photo-cli archive
Archive photos with SHA1-based deduplication and index into a local SQLite database.
photo-cli copy
Copy photos into a new organized folder with custom naming and folder strategies.
photo-cli info
Export photo metadata (date, coordinates, address) to a CSV file.
photo-cli list
Browse, filter, and open archived photos by album, date, or date range.
photo-cli address
Preview the reverse geocode response for a single photo.
photo-cli mcp
Run an MCP server to let AI assistants query your photo archive.